Category: Blockchain

  • How to create an off-chain NFT whitelist

    This technical article will explore the concept of NFT whitelisting and how to implement this for an Ethereum based NFT collection.

    First, let’s define what NFT whitelisting is: it’s the process of getting a crypto wallet address pre-approved for minting.

    It’s a common approach to prevent so called “gas wars”, where people raise the price of gas that they’re willing to pay to mint an NFT so that their transactions are picked up first, and can be a useful marketing tool where people are added to the whitelist after taking certain actions (for e.g.: in exchange for signing up to an email newsletter).

    This article will walk you through the steps involved in implementing this type of system using smart contracts on the Ethereum blockchain.

    While there are multiple valid approaches, we’ll be using a coupon system where wallet addresses are signed off-chain in a way that the smart contract can verify that it comes from a trusted source.

    By the end of this article you’ll be able to:

    • Add “whitelisting” functionality to your smart contract that will allow pre-approved wallets to mint a single NFT.
    • Architect a web solution that integrates with your smart contract’s whitelist.

    How will it work?

    Generation

    Each coupon will be a simple javascript object containing a wallet address that is signed off-chain using a private key that’s only known to us.

    Retrieval

    Our coupons will live in a simple JSON file, and will be exposed via a simple API.

    Consumption

    The resulting coupon signature can be used when calling our smart contract to prove that the data being received was generated by us.

    Let’s build it

    Generation

    Let’s start by generating our coupons. We’ll use public-key cryptography to encrypt a wallet address inside our “coupon”.

    The script below exposes a createCoupon function that accepts an address and privateKey and will return a coupon.

    const { ethers } = require(‘ethers’);
    
    async function createCoupon(address, privateKey) {
        // We’ll leverage the ethers library to create a new wallet
        // that we’ll use to sign the coupon with the private key.    
        const signer = new ethers.Wallet(privateKey);    
    
        // We need to encode the wallet address in a way that
        // can be signed and later recovered from the smart contract.
        // Hashing the address using the SHA-256 hashing algorithm
        // is a good way to do this.   
     
        const message = ethers.utils.solidityKeccak256(
            [‘address’],
            [address]
        );    
    
        // Now we can sign the message using the private key.    
        const signature = await   signer.signMessage(ethers.utils.arrayify(message));    
    
        // The signature can be expanded into it’s underlying components
        // which we can pass directly into the smart contract.
        // If we didn’t split the signature here — we’d have to do it
        // in the smart contract, which is a bit of a hassle.    
    
        let { r, s, v } = ethers.utils.splitSignature(signature);    
        return {r,s,v}
    }
    
    module.exports = {
        createCoupon,
    }

    We’ll need a key-pair to work with — the same one used to deploy your contract will work, but if you still need to generate one you can quickly create a new wallet with Metamask and export the private key from there.

    Here’s a small node.js script that will generate our coupons:

    const { createCoupon } = require("./coupons");
    const fs = require('fs');
    require("dotenv").config();// Insert private key corresponding to _couponSigner
    const privateKey = process.env.PRIVATE_KEY;// Populate with addresses to whitelist
    let addresses = [
    // ..
    ];const main = async () => {
    let output = [];
    console.log('Generating...');
    for (let i = 0; i < addresses.length; i++) {
    let signature = await createCoupon(addresses[i], 0, privateKey);
    output.push({
    wallet: mint[i],
    r: signature.r,
    s: signature.s,
    v: signature.v
    })
    }// Save the generated coupons to a coupons.json filelet data = JSON.stringify(output);
    fs.writeFileSync('coupons.json', data);
    console.log('Done.');
    console.log('Check the coupons.json file.');};const runMain = async () => {
    try {
    await main();
    process.exit(0);
    } catch (error) {
    console.log(error);
    process.exit(1);
    }
    };runMain();

    First make sure that you populate your .env file with the private key of the wallet that will be used for signing. Then, populate the addresses array in the script with a list of wallet addresses.

    Run node generateCoupons.js to generate and save your coupons to a coupons.json file. Done!

    Retrieval

    Since each coupon is only valid for a single wallet address, there is no risk if the coupons are exposed. However, for the sake of keeping the whitelist private, it’s still a good idea to hide it behind an API endpoint that responds to a wallet address and returns the corresponding coupon if found.

    While writing an API to serve these coupons is beyond the scope of this article, I can show you how easy it would be to use the below code to find and return the right coupon:

    // retrieve the wallet from the query wallet
    const wallet = req.query.wallet// Find a coupon for the passed wallet address
    const c = coupons.filter(coupon => coupon.wallet.toLowerCase() === wallet.toLowerCase())if (0 == c.length) {
    return res.status(200).json({
    coupon: null,
    message: 'Coupon not found'
    })
    }return res.status(200).json({coupon: c[0]})

    💡 The Next.js framework is an excellent choice to build this API and the remaining front-end minting website.

    Consumption

    In our smart contract, let’s start by defining a struct to represent our coupon.

    struct Coupon {
    bytes32 r;
    bytes32 s;
    uint8 v;
    }

    You might notice that this already looks like the coupon we generated with Javascript.

    In our smart contract, we need to do a couple of things to verify that the coupon is valid.

    1. Create the same message digest (containing the wallet address) that we created in our Javascript code.
    2. Use that message digest to recover the signer of our coupon.
    3. Ensure that the recovered signer is in fact, us.

    In Solidity, we can achieve this by writing two internal functions:

    // Recover the original signer by using the message digest and
    // the passed in coupon, to then confirm that the original
    // signer is in fact the _couponSigner set on this contract.function _isVerifiedCoupon(bytes32 digest, Coupon memory coupon)
    internal
    view
    returns (bool)
    {
    address signer = ecrecover(digest, coupon.v, coupon.r, coupon.s);
    require(signer != address(0), "ECDSA: invalid signature");
    return signer == _couponSigner;
    }// Create the same message digest that we know the coupon created
    // in our JavaScript code has created.function _createMessageDigest(address _address)
    internal
    pure
    returns (bytes32)
    {
    return keccak256(
    abi.encodePacked(
    "\x19Ethereum Signed Message:\n32",
    keccak256(abi.encodePacked(_address))
    )
    );
    }

    Then we can update our minting function to use our new coupon system:

    function mint(Coupon memory coupon)
    external
    payable
    { require(
    _isVerifiedCoupon(_createMessageDigest(msg.sender), coupon),
    "Coupon is not valid."
    ); // require that each wallet can only mint one token
    require(
    !_mintedAddresses[msg.sender],
    "Wallet has already minted."
    ); // Keep track of the fact that this wallet has minted a token
    _mintedAddresses[msg.sender] = true; // ...
    }

    And there we have it! It’s important to keep track of the wallets that have minted in order to prevent coupons from being reused.

    On the minting website we need to pass our coupon when calling the mint function:

    async function fetchCoupon(wallet) {
    const res = await fetch(`/api/coupons?wallet=${wallet}`) return await res.json()
    }async function mint(wallet) {
    const coupon = await fetchCoupon(wallet) let tx = await contract.mint(coupon) // ...}

    Conclusion

    You’ve learnt a simple, secure and effective method to implement an NFT whitelist.

    This article is a specially re-written extract from my upcoming book launch: “A developer’s guide to launching an NFT collection”.

    Follow me on twitter for more blockchain-related tips and tricks, and to keep in the loop about the book!
  • Create a pre-reveal mechanism for your NFT collection

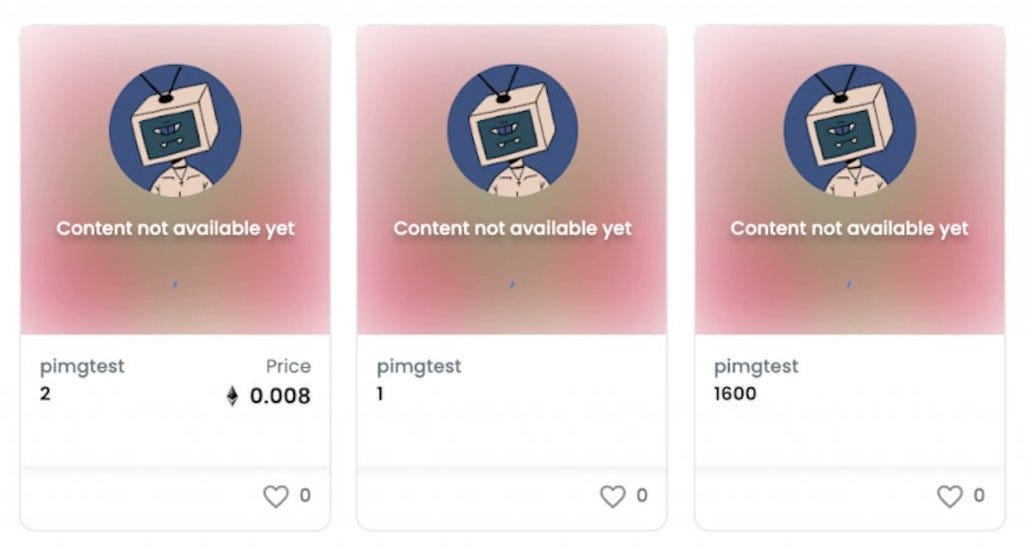
    It’s become a common practice when launching a new PFP style NFT collection (a la Bored Ape Yacht Club) to use a placeholder image for every NFT minted, and to only reveal the final NFTs once all NFTs have been minted.

    This is an important practice because without it snipers can choose which NFTs to mint based on the rarities of the traits exposed through the metadata.

    NFTs with a pre-reveal placeholder image

    Before starting to build this feature, let’s expand on our business requirements:

    • Hide the tokens and metadata until all tokens have been minted
    • Send a “pre-reveal” version of the token to users once they mint
    • Allow the contract owner to “reveal” all tokens in the collection

    Our smart contract is responsible for returning the URL where each token’s metadata.json file lives.

    The way we can solve for the above is to create a “pre-reveal” metadata file and upload it somewhere (e.g.: https://example.org/pre-reveal.json). This “pre-reveal URI” is what we want to return for every token until the reveal takes place.

    After the reveal, we want to be able to update the smart contract with a new URL that can be used to generate the correct token URIs. For example, if we’ve uploaded all our tokens to a web-server that responds to https://exmaple.org/tokens/:tokenId, then we’ll want to update the smart contract with our baseURI (https://example.org/tokens/) so that it can easily generate the correct tokenURI by simply appending the token ID to the baseURI.

    With this knowledge, we can redefine the problem to more concrete asks of our smart contract:

    • It should return a generic metadata when the collection is not yet revealed
    • It should allow the contract owner to update the baseURI
    • It should return the correct metadata when the token is revealed

    How do we implement it?

    Let’s assume that we are developing a smart contract for an NFT collection that extends off the usual OpenZeppelin ERC721implementation.

    If you inspect the ERC721.sol contract, you’ll find that a tokenURI function is implemented there.

    Here it is, for your reference:

    OpenZeppelin’s implementation of tokenURI

    Their implementation (above) will automatically concatenate the base URI (returned from _baseURI() – which we’ll need to remember for later) with the token ID being retrieved. This is great for AFTER the reveal – but for the pre-reveal we’ll need to override this function to return our pre-reveal URI:

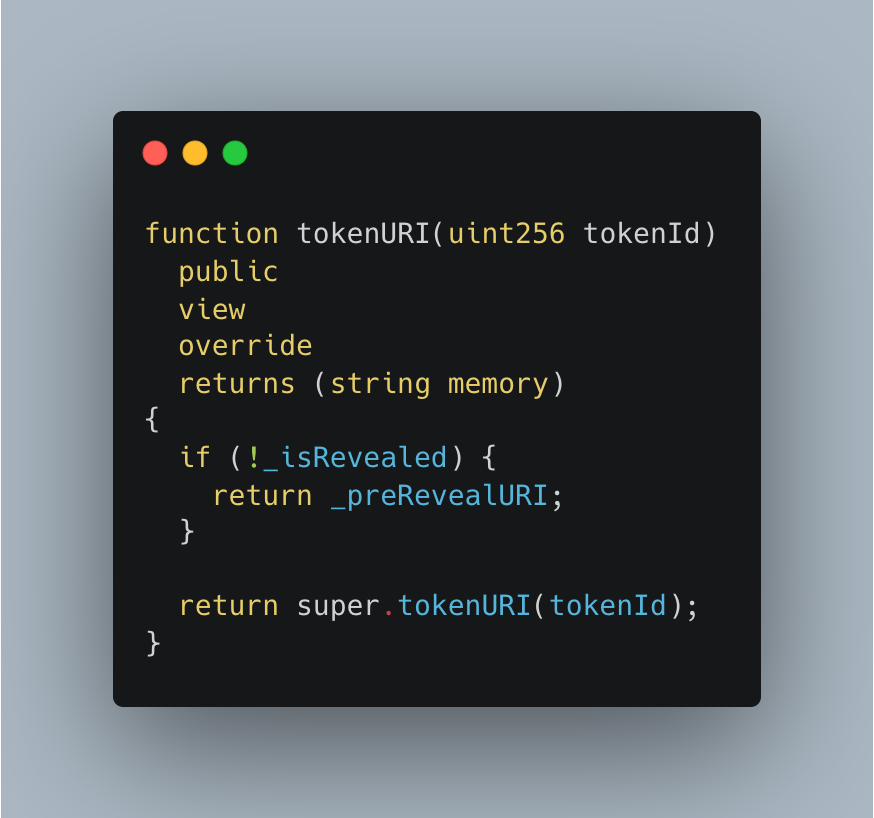
    The tokenURI function

    You’ll notice that we have a couple of global variables referenced: _isRevealed and _preRevealURI. You can implement these however you like, but at it’s simplest you can simply define them at the top of your contract:

    Next we’ll need to create a function to “reveal” the token.

    The above reveal function will save the passed baseURI to a global variable called _postRevealBaseURI and will set the _isRevealed boolean to true.

    We’re almost done, with the _isRevealed boolean set to true, then the tokenURI function that we wrote earlier will defer to the parent class’ implementation. If you remember, this implementation calls a _baseURI function to retrieve the base URI.

    If we inspect that implementation, we can see that it’s actually there to be overridden:

    Let’s oblige OpenZeppelin and override the _baseURI function to return the correct base URI!

    Conclusion

    You’ve learnt a simple, secure and effective method to implement an NFT pre-reveal mechanism.

  • Blockchain Island and the future of Malta’s budding Blockchain industry

    This is a reproduction of an article I originally posted on LinkedIn. Please leave any comments on the original LinkedIn article.

    As of 3rd July 2018, Malta has become the first country to provide a legal framework for businesses working in the blockchain space. That and the friendly political attitude towards blockchain-based companies means that more foreign companies (like Binance) will set up shop in Malta, more local companies (like Intelliblock) will emerge and more opportunities for blockchain developers & consultants, corporate & legal services and marketing services will be there for the taking.

    If you can identify as one of the above services and aren’t sure how to get started in the blockchain industry, then this article is for you – it will explore what services will be required to sustain this new sector.

    Who will be regulated by these new bills?

    The line between Financial Services and Virtual Financial Assets (VFAs) is an important distinction since only VFAs will be regulated by these new bills. The Malta Financial Services Authority (MFSA) have devised a Financial Instrument Test to help distinguish between the two. The proposed test is thorough, but for the purpose of this article we can casually define VFAs to include all traded cryptocurrencies, brokerages, eWallet providers etc.

    Approval of an ICO

    The current blockchain and ICO space is littered with scams, making it difficult for consumers to identify legitimate projects. Malta’s new regulatory laws surrounding the launch of ICOs solves this problem by allowing good intentioned companies to be recognised as such by setting up shop in Malta – where they’ll have to acquire a seal of approval for their ICO from the MFSA.

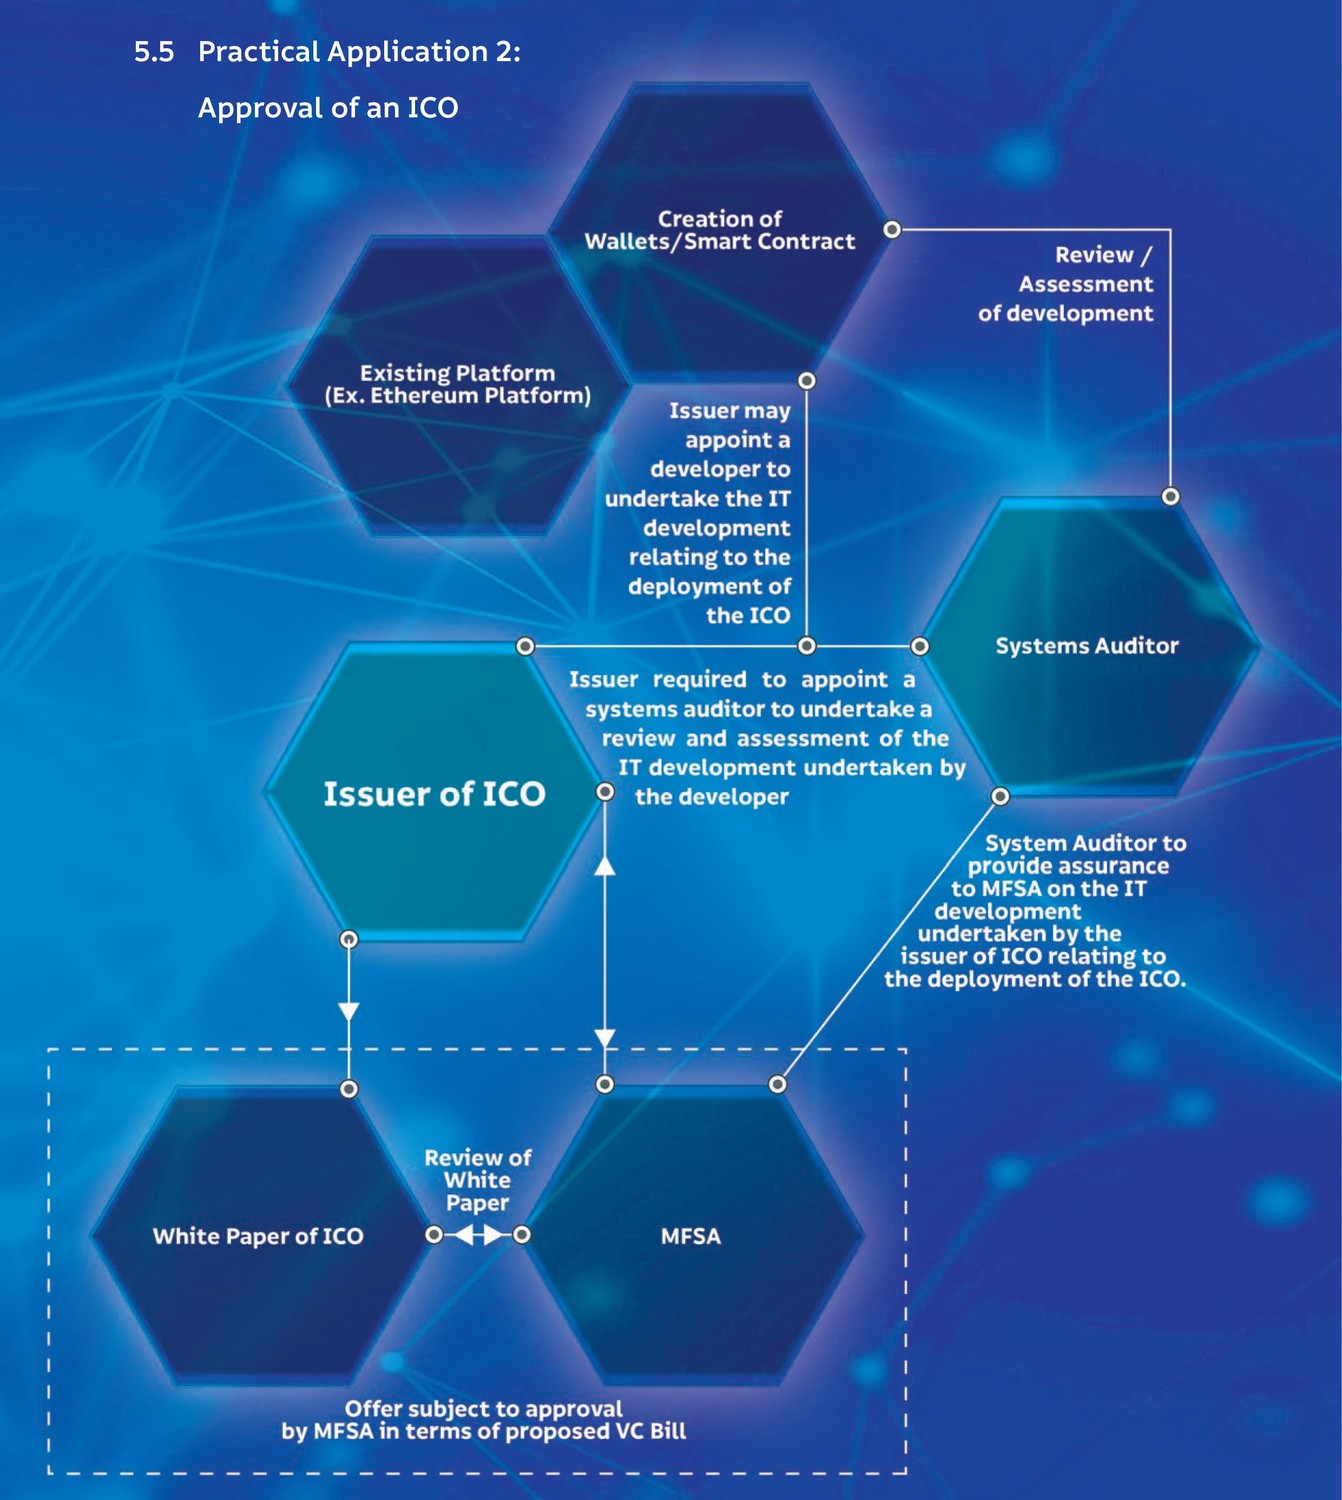
    I’ve summarised the process that a company must go through in order to issue an ICO in Malta, below (and have included the flow chart from the “Malta – A Leader in DLT Regulation” document released by the government of Malta).

    1. The Issuer of the ICO employs (or contracts) a blockchain developer to undertake the IT development related to the deployment of the ICO.
    2. The Issuer is required to appoint a Systems Auditor to undertake a review and assessment of the IT development.
    3. The Systems Auditor can act as a consultant during the development process and review and assess the development of smart contracts and/or wallets as they are developed on an existing blockchain platform (e.g.: Ethereum)
    4. The Systems Auditor must provide assurance to MFSA on the IT development undertaken by the Issuer relating to the deployment of the ICO.
    5. The Issuer must provide a White Paper to the MFSA, which must be reviewed and approved (in terms of proposed VC Bill).

    From the approval steps above, we can identify a number of services required.

    Blockchain Developers and Consultants

    ICO issuers won’t necessarily be tech companies and might need to outsource the actual development. Even if the company has an in-house development team, a consultant might still be required to help guide the development team or write the White Paper.

    Blockchain Systems Auditors

    By law, an external auditor must be appointed in order to obtain approval from the MFSA. The auditor will need to know the ICO regulations inside out and should have the technical expertise necessary to audit the code and oversee the development process.

    Certification of a Distributed Ledger Technology (DLT) Platform

    DLTs remove the need for a “trusted intermediary” between two parties by introducing the concept of smart contracts to independently ensure that both parties uphold their end of the deal. Smart contracts must be honest, robust and hardened – all aspects that can be verified by a proficient blockchain developer due to the open sourced nature of smart contracts.

    Even though it’s possible for anyone to read the code of a smart contract to verify it’s correctness, it’s unfeasible to expect people to do so. Here enters the soon to be created Malta Digital Innovation Authority (MDIA), who will provide DLT platforms certifications denoting that their product has passed the MDIA’s criteria for correctness.

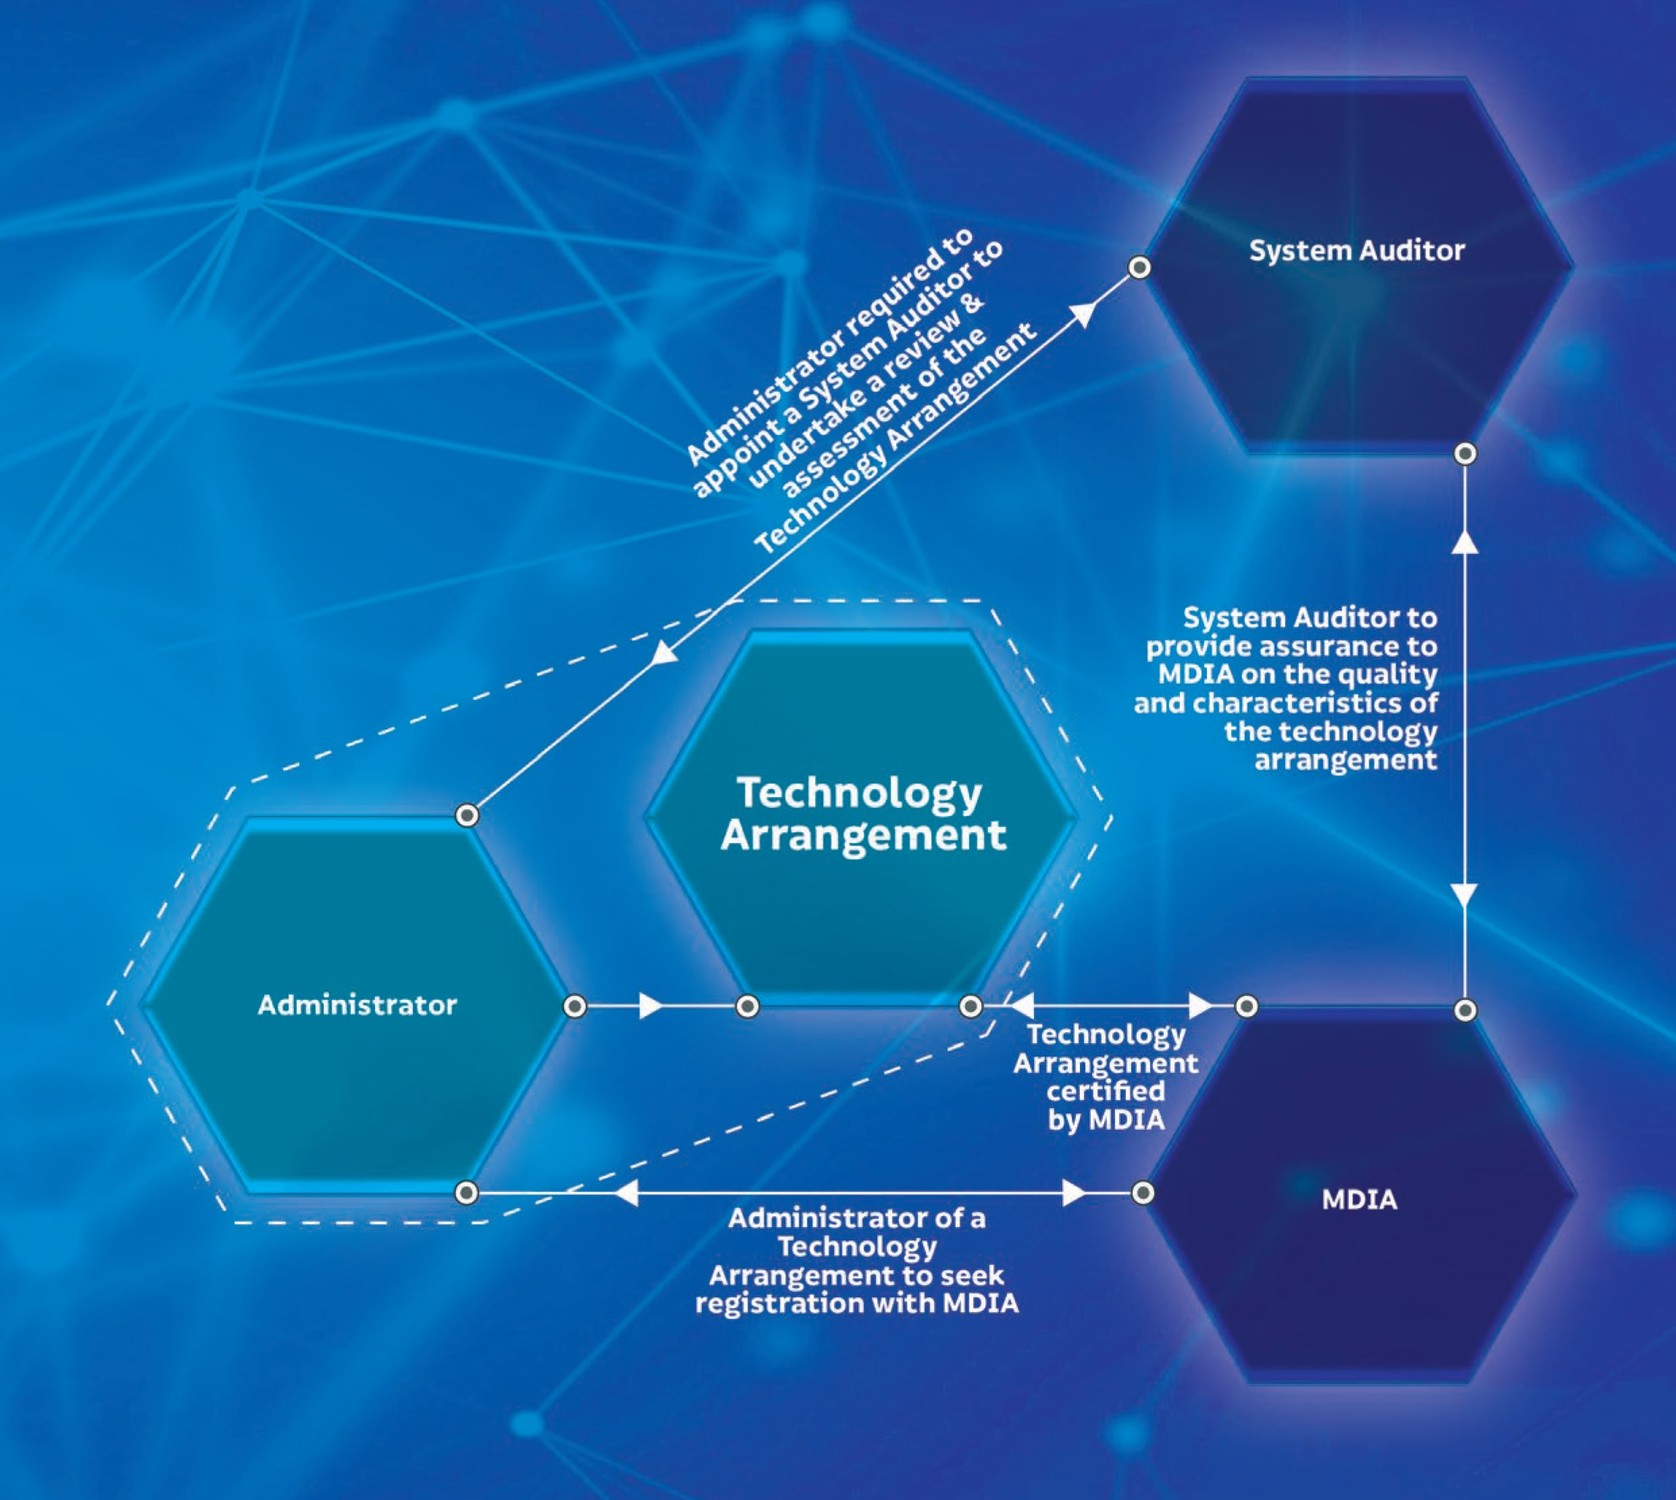
    I’ve summarised the process that a company must go through in order to get their DLT platform certified by the MDIA, below (and have included the flow chart from the “Malta – A Leader in DLT Regulation” document released by the government of Malta). Note that in order to make the bill more future proof, the term “Technology Arrangement” is used instead of “DLT Platforms” so as to be able to eventually cover more technologies (like AI).

    1. Employ an Administrator of Technology Arrangements to manage the Technology Arrangement.
    2. The Administrator must seek registration with MDIA.
    3. The Administrator must appoint a System Auditor to undertake a review and assessment of the Technology Arrangement.
    4. The System Auditor must provide assurance to MDIA on the quality and characteristics of the Technology Arrangement.
    5. After being successfully audited, the MDIA will certify the Technology Arrangement.

    Apart from the Systems Auditor who would play a similar role as in an ICO approval, you’ll notice the introduction of the new “Administrator of Technology Arrangements” designation. These administrators (like the auditors) are official roles that must be certified in order to be recognised by the MFSA and the MDIA.

    Indirect Opportunities

    Apart from the skilled workers required to help companies launch ICOs and DLT platforms, a number of other sectors will indirectly benefit from Malta becoming a “Blockchain Island”.

    Corporate and Legal Services

    Malta currently has one of the most advanced legal frameworks for blockchain based companies making it an attractive place for companies to relocate to or set up shop here from scratch. New companies need to be set up that will also require financial services.

    Digital & ICO Marketing

    New companies with new products need new customers, acquired through marketing.

    Blockchain Strategy Consultants

    DLTs are disruptive, since they provide new solutions to old problems – but sometimes it’s hard to see the “DLT” solution. Strategy consultants can help to identify areas in your business that can benefit from DLTs.

    With any luck, I’ve been able to shed some light on what the future of the Blockchain Island will bring. If you’re looking for some more inspiration and resources to keep updated in the space, I’ve compiled a short list of people and projects to follow to help you stay connected.

    In no particular order: