Author: mikestivala

  • Refactoring Advanced Eloquent Filters To Collections

    Amo Chohan wrote a very good article detailing a technique he uses to clean up controllers when dealing with complex search queries in eloquent.

    I’m also enjoying Adam Wathan‘s latest release: Refactoring to Collections – a read guaranteed to make you smarter.

    Amo really nailed the functionality here – but I think the final class presented could use some of Adam’s magic to make it just a little bit better. Let’s be honest – I’ve just been looking for an excuse to try out some of Adam’s techniques…

    Below is the original class, and then my refactors.

    <?php
    
    namespace App\UserSearch;
    
    use App\User;
    use Illuminate\Http\Request;
    use Illuminate\Database\Eloquent\Builder;
    
    class UserSearch
    {
        public static function apply(Request $filters)
        {
            $query = 
                static::applyDecoratorsFromRequest(
                    $filters, (new User)->newQuery()
                );
    
            return static::getResults($query);
        }
        
        private static function applyDecoratorsFromRequest(Request $request, Builder $query)
        {
            foreach ($request->all() as $filterName => $value) {
    
                $decorator = static::createFilterDecorator($filterName);
    
                if (static::isValidDecorator($decorator)) {
                    $query = $decorator::apply($query, $value);
                }
    
            }
            return $query;
        }
        
        private static function createFilterDecorator($name)
        {
            return return __NAMESPACE__ . '\\Filters\\' . 
                str_replace(' ', '', 
                    ucwords(str_replace('_', ' ', $name)));
        }
        
        private static function isValidDecorator($decorator)
        {
            return class_exists($decorator);
        }
    
        private static function getResults(Builder $query)
        {
            return $query->get();
        }
    }

    Removing Static

    Since all methods in this class are static, we can’t keep track of state. We end up passing around the variables that we’re using (the Request and Builder in this instance) to every method.

    By adding a private constructor, we can keep the Api of the class the same, but internally gain the benefits of working with an object!

    protected $filters;
    protected $query;
    
    private function __construct(Request $request, Builder $query)
    {
        $this->filters = collect($request->all());
        $this->query = $query;
    }
    
    public static function apply(Request $request)
    {
        return (new self($request, User::query())->applyFilters()->getResults();
    }

    I’ve refactored the apply method to create a new instance of the object, and then call the appropriate methods to return the desired results. Since we don’t need the actual Request object anywhere else, I’ve gone ahead and created a collection out of the inputs for future use.

    Introducing a Null Object

    Currently we’re looping through the request inputs, and checking to see if we can find an existing filter to apply:

    foreach ($request->all() as $filterName => $value) {
    
        $decorator = static::createFilterDecorator($filterName);
    
        if (static::isValidDecorator($decorator)) {
            $query = $decorator::apply($query, $value);
        }
    }

    One way to get rid of that conditional is by introducing a null object that effectively accepts the query, but does nothing with it.

    private function getFilterFor($name)
    {
        $filterClassName = $this->createFilterDecorator($name);
    
        if (! class_exists($filterClassName)) {
            return new NullFilter;
        }
    
        return new $filterClassName;
    }

    The above method allows us to refactor the applyDecoratorsFromRequest method (that I’ve renamed to applyFilters) into the following:

    private function applyFilters()
    {
        $this->filters->each(function ($value, $filterName) {
            $this->getFilterFor($filterName)->apply($this->query, $value);
        });
    
        return $this;
    }

    Since our filters are now a collection, we have access to the each method which I’ve used here instead. The getFilterFor method will always return a valid class that we can use – even if it is just a null object – allowing us to forego any conditionals!

    I’m returning $this just for convenience’s sake to allow me to chain my method calls.

    Alternatively…

    A refactor to my own method getFiltersFor could also more heavily make use of collections, and we can end up with a solution that completely eliminates loops and conditionals:

    private function getFilterFor($name)
    {
        return $this->filters->map(function ($value, $filterName) {
            return $this->createFilterDecorator($filterName);
        })->filter(function ($filterClassName) {
            return class_exists($filterClassName);
        })->map(function ($filterClassName) {
            return new $filterClassName;
        })->get($name, new NullFilter); 
    }

    We’ve reworked the flow to do the following:

    • Map all filter names to class names
    • Filter out class names that aren’t implemented
    • Map all class names into new instances
    • Get the appropriate filter object, or return a new NullFilter if it doesn’t exist

    In this case it’s debatable as to whether this second refactor adds any value – but an interesting solution nonetheless.

    Moving On

    For those who suffer from long and complicated index methods on your controllers, I urge you to read the original article by Amo.

    As a side note, all of the refactors that I performed on the class (creating a private instance, introducing a null object, and refactoring to collections) were all lessons learned from Adam Wathan’s Refactoring to Collections book.

    Happy coding!
  • Stress Testing a Website with Throng

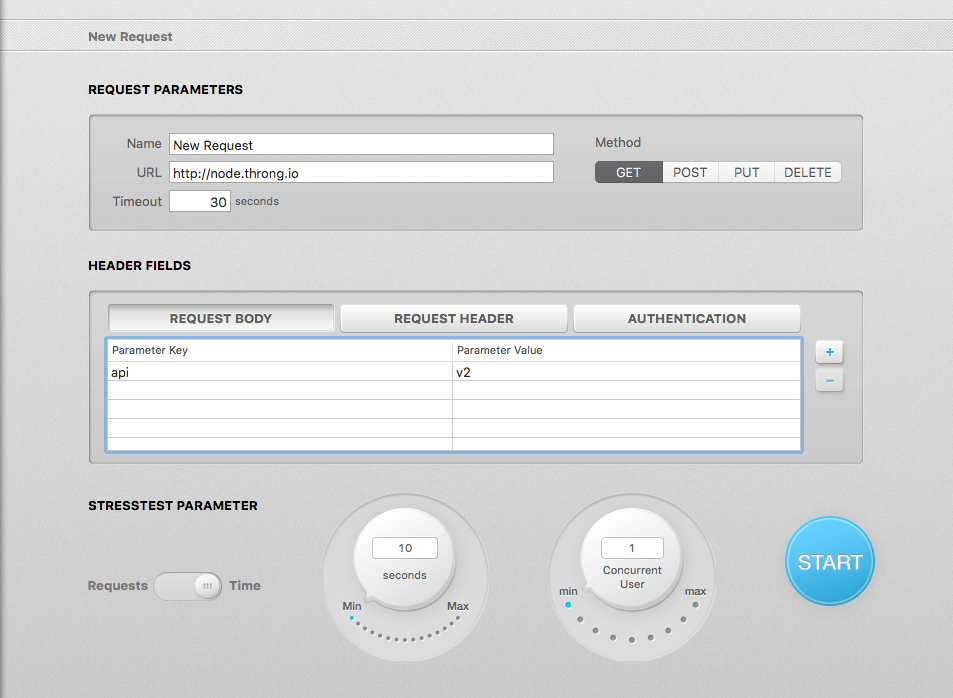
    I recently needed to stress test a website to ensure that it could hold up in the real world – after some searching I stumbled upon Throng – a simple app for Mac. It allowed me to hit my website with concurrent requests for a specified period of time.

    You can download the 7-day trial of Throng from this link.

    The app allows you to specify a URL you’d like to hit, a time limit in seconds, and the number of concurrent users to simulate. Hit Start and it will immediately begin hitting your website – charting the average response time.

    Alternatives

    Load Impact – An online tool service to stress test your website. I tried it until my credits ran out – but I found that for my (simple) needs Throng was a better choice.

  • Creating an Embeddable Javascript Widget

    One of the updates I’m working on for WhichBeach is the ability for other website owners to embed WhichBeach widgets that will display up-to-date beach data. This is very much a work in progress, but I’d like to share.

    I’ve never done anything like this before, so I thought I’d start by taking some inspiration from Facebook’s Like Button implementation:

    <!-- Load Facebook SDK for JavaScript -->
    	<div id="fb-root"></div>
    	<script>(function(d, s, id) {
    	  var js, fjs = d.getElementsByTagName(s)[0];
    	  if (d.getElementById(id)) return;
    	  js = d.createElement(s); js.id = id;
    	  js.src = "//connect.facebook.net/en_US/sdk.js#xfbml=1";
    	  fjs.parentNode.insertBefore(js, fjs);
    	}(document, 'script', 'facebook-jssdk'));</script>
    
    	<!-- Your like button code -->
    	<div class="fb-like" 
    		data-href="http://www.your-domain.com/your-page.html" 
    		data-layout="standard" 
    		data-action="like" 
    		data-show-faces="true">
    	</div>

    To break it down, Facebook’s script injects a new script tag that pulls in their Javascript SDK. They’re also ensuring that the script is only injected once into the page.

    I think I can make this work for me too:

    <!-- Load WhichBeach SDK for Javascript -->
    <div id="wb-root"></div>
    <script>(function(d, s, id) {
      var js, fjs = d.getElementsByTagName(s)[0];
      if (d.getElementById(id)) return;
      js = d.createElement(s); js.id = id;
      js.src = "//whichbeach.app/js/sdk.js";
      fjs.parentNode.insertBefore(js, fjs);
    }(document, 'script', 'whichbeach-jswidget'));</script>
    
    <div class="wb-widget" data-size="skyscraper"></div>

    Great. Now all that’s left is to write a Javascript SDK! I’ll need to expose that on /js/sdk.js and add all my widget logic in there.

    In due time… if anyone has any tips and resources that they think I should be using – let me know in the comments!

  • Applying Text Transform to Form Inputs

    I often find myself in the situation where a design calls for form inputs to transform the user’s text. It’s pretty easy to do nowadays:

    input[type="text"] {
        text-transform: uppercase;
    }

    This is what it looks like:

    But – I’ve always found these types of interactions frustrating whenever I come across them. The expectation of the user is jarred when the user’s input changes unexpectedly. I decided to do some research and found a couple of posts on the subject.

    Is text-transform uppercase frustrating when used in input form fields?

    Here’s a discussion on UX Stack Exchange that suggests transforming the text after the field loses focus. This javascript solution does seem slightly better than a simple CSS transform – but I still find it awkward when I come across these forms.

    The User Experience (UX) Of CSS Text-Transform On Form Input Fields

    Ben Nadal wrote an interesting commentary about how CSS transforms on form inputs causes frustration and confusion. I agree with him here.

    So what’s the best way to do it?

    I say – don’t ever transform a user’s input in a form field. User’s have come to expect forms to act in a certain way, and changing that (even for the better) gives your form an extra learning curve.

    If you really need to transform the user’s input somehow, I did come up with an elegant solution recently – by showing the user a summary of their form input (after or while they’re filling in the form) you can get the best of both worlds.

    The user can refer to the form where the text that they have input remains unchanged. At the same time, they can see the summary where they text that they’ve input has been modified in some way.

    I’d be interested to hear if anyone has any thoughts or findings on the topic in the comments!

  • Immutable Objects Will Improve Your Life

    Learning about immutable objects improved my PHP code thoroughly. I’ve listed some helpful resources below that really helped me grasp the concept of immutability and value objects.

    As a quick example, if your code sometimes looks like this:

    <?php
    
    class Weather
    {
        protected $region;
    
        public function setRegion($region)
        {
            $this->region = $region;
        }
    
        private function getRegion()
        {
            if (! $this->region) {
                throw new RegionNotSetException;
            }
        }
    
        public function doSomething()
        {
            $region = $this->getRegion();
    
            // ...
        }
    }
    

    When it should be looking (more) like this:

    <?php
    
    class Weather
    {
        protected $region;
    
        public function __construct($region)
        {
            $this->region = $region;
        }
    
        public static function fromRegion($region)
        {
            return new self($region);
        }
    
        public function doSomething()
        {
            $region = $this->region;
    
            // ...
        }
    }
    

    Then I urge you to read up on immutable objects. Below are some of the articles that I found most helpful.

    The Fowler Money Pattern

    Here’s a very well written article, using Money as an example of an object that should be immutable.

    http://verraes.net/2011/04/fowler-money-pattern-in-php/

    Difference Between Entities and Value Objects

    Philip Brown wrote a very good explanation highlighting the differences between Entities (which are what your regular Laravel models are) and Value Objects. A real eye opener.

    http://culttt.com/2014/04/30/difference-entities-value-objects/

    An Interesting Discussion

    Here’s a discussion debating the pros and cons of immutable objects, and a little history.

    http://programmers.stackexchange.com/questions/151733/if-immutable-objects-are-good-why-do-people-keep-creating-mutable-objects

    Immutability in Javascript

    I’m been doing a lot of development in Vue.js recently, though I’ve never worked towards immutability in javascript. The article linked is an interesting read, and led me to discover immutability.js – a library created by Facebook with a number of immutable data structures.

    http://www.sitepoint.com/immutability-javascript/

    I wonder – does anyone have any experience in working with immutability in javascript with Vue.js or other similar frameworks? I’d be interested to hear your thoughts on the subject in the comments.

  • Logging Guzzle Requests

    When you’re building an API consumer, you should log your API requests and responses. Otherwise it can feel like you’re working blind.

    Here I’ll explain how to configure a Guzzle Middleware to log requests to a file. This is useful for debugging and historical purposes.

    The way to do this is to pass a new HandlerStack with our logging middleware into our Client instance.

    The syntax for creating a new Guzzle instance is as follows:

    $client = new \GuzzleHttp\Client([
        'base_uri' => "http://www.example.com/api",
        'handler' => $handlerStack,
        ]),
    ]);

    The $handlerStack will eventually hold the middleware that handles the logging.

    Setting up the log file

    Before I can set up the middleware, I need to instantiate something that handles writing our log messages to file. I’ll use the Monolog package to handle this – it makes it easy to achieve my desired criteria of having a daily log file next to my default laravel.log.

    In my AppServiceProvider I’ll set up a helper function to create the logger:

    private function getLogger()
    {
        if (! $this->logger) {
            $this->logger = with(new \Monolog\Logger('api-consumer'))->pushHandler(
                new \Monolog\Handler\RotatingFileHandler(storage_path('logs/api-consumer.log'))
            );
        }
    
        return $this->logger;
    }

    Setting up the middleware

    Guzzle’s logging middleware requires a logger (that I’ve just created above) and a MessageFormatter instance that controls what gets logged.

    I’ll set up a helper function to create the middleware:

    private function createGuzzleLoggingMiddleware(string $messageFormat)
    {
        return \GuzzleHttp\Middleware::log(
            $this->getLogger(),
            new \GuzzleHttp\MessageFormatter($messageFormat)
        );
    }

    The $messageFormat is a string that “Formats log messages using variable substitutions for requests, responses, and other transactional data.” Possible substitutions can be seen here – but I’ve come up with some handy ones:

    Logging the request: {method} {uri} HTTP/{version} {req_body}
    Logging the response: RESPONSE: {code} – {res_body}

    Creating the HandlerStack

    Now that I have a way to easily new up an instance of Guzzle’s logging middleware, I can create a new HandlerStack to push the middleware onto:

    $handlerStack = \GuzzleHttp\HandlerStack::create();
    
    $handlerStack->push(
        $this->createGuzzleLoggingMiddleware($messageFormat)
    );

    Logging the request and response separately

    I decided to log the request and response in two separate log entries. It seems like the only way to accomplish this is to push multiple logging middlewares to Guzzle, so I set up a helper function to create a HandlerStack with all the required logging middleware from an array of message format strings that I would like to log.

    private function createLoggingHandlerStack(array $messageFormats)
    {
        $stack = \GuzzleHttp\HandlerStack::create();
    
        collect($messageFormats)->each(function ($messageFormat) use ($stack) {
            // We'll use unshift instead of push, to add the middleware to the bottom of the stack, not the top
            $stack->unshift(
                $this->createGuzzleLoggingMiddleware($messageFormat)
            );
        });
    
        return $stack;
    }

    And there we have it! Now, adding multiple loggers to our Guzzle Client is as easy as the code below:

    $client = new Client([
        'base_uri' => "http://example.com",
        'handler' => $this->createLoggingHandlerStack([
            '{method} {uri} HTTP/{version} {req_body}',
            'RESPONSE: {code} - {res_body}',
        ]),
    ]);

    A short note on working with Guzzle responses

    After setting up the logger, I realised that I was no longer able to access the response body – it turns out it was my mistake. 

    Previously, I was accessing the response content using the following line:

    $this->client->get($endpoint)->getBody()->getContents();

    But it turns out that this gets the “remaining contents of the body as a string” – and since the middleware already accessed the body in order to log it, there isn’t any content remaining to retrieve.

    The correct way to access the response content is to cast the body to a string:

    (string) $this->client->get($endpoint)->getBody();

    Resources

    I lead the tech team at Mindbeat, follow me on Twitter as I continue to document lessons learned on this journey.

  • Pushing Logic to Custom Collections

    This is a technique that I recently found useful. Eloquent models allow you to specify a custom collection object to be returned – which sometimes can be a great place to put some business logic.

    While refactoring WhichBeach, I used a custom collection to move some logic from the Beach model to a custom BeachCollection. This allowed me to test the logic in isolation.

    Creating the Custom Collection

    I created a new class extending Laravel’s Eloquent Collection:

    <?php
    
    namespace WhichBeach\Beach\Support;
    
    use Illuminate\Database\Eloquent\Collection;
    
    class BeachCollection extends Collection
    {
    
    }

    In my model, I instructed Laravel to use my custom collection:

    <?php
    
    namespace WhichBeach\Beach\Entities;
    
    use WhichBeach\BaseModel;
    use WhichBeach\Beach\Support\BeachCollection;
    
    class Beach extends BaseModel
    {
        /**
         * Create a new Eloquent Collection instance.
         *
         * @param  array  $models
         * @return \WhichBeach\Beach\Support\BeachCollection
         */
        public function newCollection(array $models = [])
        {
            return new BeachCollection($models);
        }
    }
    

    Adding the Logic

    Now that I had a place to put my custom code, I could add any number of helper methods to be used throughout my application:

    /**
     * Filter the beaches to only contain major beaches
     *
     * @return static
     */
    public function major()
    {
        return $this->where('is_major', true);
    }
    
    /**
     * Filter the beaches to only the ones that have the lowest score
     *
     * @return static
     */
    protected function lowestScoring()
    {
        return $this->where('score', $this->min('score'));
    }

    Edit: The above code block has been improved after an excellent suggestion by Joseph Silber in the comments.

    This has given me the ability to write more fluent code when dealing with beaches:

    $topBeach = $beaches->major()->lowestScoring()->random();

    Being able to write the line above is a big plus for me – the less cognitive load required to understand the intended output, the better.

    Let me know of any good examples of using custom collections in the comments!

  • Don’t Build Salmon Cannons

    Today I learned about Salmon Cannons. Salmon have evolved to swim up river to spawn, but the introduction of dams has created a sometimes impossible obstacle for salmon to overcome.

    A clever solution has been found in the way of the Salmon Cannon – a slippery tube that sucks salmon over obstacles so that they can continue their journey upstream.

    The Salmon Cannon is a solution to a problem that the world found itself in – Salmon could no longer swim upstream because they were blocked by the dams. Human beings – being the creative and pragmatic bunch that we are – found a creative and ingenious solution to the problem at hand.

    As developers we’re problem solvers, and building the code equivalent of a Salmon Cannon is something that we do on a daily basis.

    We find ourselves in the middle of a problem – a challenge, even – and we do what we do best. We code our way out of it. It’s natural.

    But… on further thought – the Salmon Cannon isn’t the ultimate solution. The problem that we were given was How can we help Salmon with their journey upstream – when dams are blocking their way? We’ve solved that.

    But maybe a better approach would have been to stop, and consider the possibility Do we still need the dam, or can we just remove it? Sure – sometimes this is out of the question, but in reality – sometimes this really is the solution.

    I see this in development all the time. Developers find themselves a problem – and they try dozens of ways of solving it – never stopping to think why they’ve found themselves in that predicament in the first place. I’ve found that so many times the solution to a problem is to change it.

    Coding without thought is a hard vice to break – but once you do, you’ll find yourself producing solutions that you can look back on and be proud of.

    Don’t be a Salmon Cannon builder, be a dam destroyer!

  • Things I Used To Do (That Aren’t Cool Now)

    I’m the proud owner of WhichBeach – the website that tells you which beach is best to visit (in Malta) based on the weather, updated hourly.

    As I’m picking up the codebase ahead of this Summer’s updates, I can’t help but review and refactor the existing code. It’s interesting to dissect previous design decisions. Also, I’ve learnt so much in the last year that it’s only natural for me to want to bring the standard of an older project up a bit.

    Here’s a list of things that I used to do, that aren’t cool now.

    I used to not have a coding style guide

    I was blissfully unaware that coding style guides even existed! Sure – I had my own patterns that I tried to stick to, but they weren’t enforced.

    The solution to this one is easy – I’ve already converted the codebase to PSR-2 – though it was somewhat of a manual process of opening each file and running the PHP Coding Standards Fixer. I’m sure there’s a quicker way through the terminal that I’m not aware of – perhaps someone can enlighten me in the comments.

    Edit:

    Julio pointed out in the comments that the command to convert your files to PSR-2 is the following:

    php-cs-fixer fix --level=psr2 path-to-your-files/

    Thanks Julio!

    I used to group my files by layer

    I organised my code into top level folders like:

    • Handlers
    • Helpers
    • Interfaces
    • Listeners
    • Observers
    • Queues

    I’m sure it felt like I was being organised while I was doing it, but it turned out to be highly impractical: you can’t glance at a folder (say “Beaches”) and get an overview of all that business logic that is associated to Beaches – the logic is scattered across different parts of the system.

    Also, looking inside these Layer folders, you find code that is quite unrelated to each other, and unlikely to be used together.

    I’ve recently been experimenting with Vue and Vueify – the approach taken there is that since the Javascript and Html work so closely together… put them in the same file!

    A more general rule might be: Code that works together should be kept together.

    The solution to this problem is to carefully refactor and reorganise my code structure.

    I used to code without automated tests

    I’m scared to change any of the core logic of this project! Sometimes I have to pull in live data to see how the system reacts! I can’t test drive anything!

    These are all fears that I used to live without, but haunt me today. A slight exaggeration – yes, but legitimate concerns when moving forward with the project.

    The solution is in the works. I’ve set up a testing environment with an in memory database, and have started adding tests to existing functionality. I’m refactoring along the way using the Test Driven approach.

    My predicament? Should I first add as many tests as possible to the existing codebase, and then refactor? Or should I refactor as I write the tests, so that the first time the test is written, it changes the code to be inline with my new rules of development? I’m leaning towards the second option, but I have my doubts.

    I used to do a lot of image manipulation myself

    This stuff is hard. Yes, I used available packages that handled the image manipulations, but I still had to handle a lot of the logic myself.

    At the moment, the payoff isn’t worth the work and maintenance. My solution is to get rid of most of my Image related logic, and instead use Spatie’s wonderful Media Library Package. I use it for a number of other projects and it fits the bill perfectly.

    I used to have self validating models

    A couple of years ago, this seemed to be the thing to do – but I’ve been bitten by this approach a couple of times.

    Using Laravel’s Form Request Validation is a good way to get some code out of my Models (the validation rules) and Controllers (the validation logic).

    I used to have an administration area

    This isn’t a “bad decision” per se – but it doesn’t align with my plans for the future – which is to be a user powered app where logged in users are enabled to do things like add new beaches, comments and reviews.

    The solution? Rip out all the administration area! (Yikes!) Then, slowly test drive the front-end driven way to get data into the website from logged in users. I’ll still need to have an authorization system where some content is only editable by administrators – but the idea is to have a lot of user driven content.

    Let me know in the comments if you’ve had experience with this before!


    The above is a rough game plan for the future of WhichBeach, and a reminder that as developers we’re always evolving!

    Time to get to work.


  • Setting the default value of a select tag in Vue.js

    I recently came a cross a small stumbling block when rendering a select box from data passed to my component via props.

    This is my component:

    <template>
       <select v-model="tag">
            <option value="">Choose...</option>
            <option v-for="tag in tags" v-bind:value="tag.id">{{ tag.name }}</option>
       </select>
    </template>
    
    <script>
    
        export default {
    
            props: {
                tags: Array,
                tag: String
            }
        };
    </script>

    And I’m including it in a parent Vue instance like so:

    <search-filters :tags="tags" :tag="store.state.query.tag_id"></search-filters>

    The Problem

    I want to be able to set the selected tag from my parent instance. This works fine using the code above – the problem occurs when the current tag_id is not set in my store object.

    When the tag_id is not set in my store object, I want my component to default to the “Choose…” option.

    Digging Deeper

    When the tag_id is not defined in my store object, it’s being set as null on my component. I thought this was what I wanted, but this does not select the “Choose..” option by default since the Html value of the option is an empty string. What I actually want is the tag to explicitly be an empty string when it isn’t set.

    The Solution

    While I could probably perform a quick check when including my component and do something like the following:

    <search-filters :tags="tags" :tag="store.state.query.tag_id ?: ''"></search-filters>

    It doesn’t solve the problem if this component is going to be included in many places. It also makes my component somewhat brittle since it relies on being instantiated in a particular way.

    Instead, I resorted to setting a default value for my “tag” prop. This default value is used when the :tag prop isn’t passed, or is null – just what I wanted!

    The code to set a default value to the prop is lifted from the vue.js documentation:

    <script>
    
        export default {
    
            props: {
                tags: Array,
                tag: {
                    type: String,
                    default() { 
                        return ''; 
                    }
                }
            }
        };
    </script>

    Simples!