This technical article will explore the concept of NFT whitelisting and how to implement this for an Ethereum based NFT collection.
First, let’s define what NFT whitelisting is: it’s the process of getting a crypto wallet address pre-approved for minting.
It’s a common approach to prevent so called “gas wars”, where people raise the price of gas that they’re willing to pay to mint an NFT so that their transactions are picked up first, and can be a useful marketing tool where people are added to the whitelist after taking certain actions (for e.g.: in exchange for signing up to an email newsletter).
This article will walk you through the steps involved in implementing this type of system using smart contracts on the Ethereum blockchain.
While there are multiple valid approaches, we’ll be using a coupon system where wallet addresses are signed off-chain in a way that the smart contract can verify that it comes from a trusted source.
By the end of this article you’ll be able to:
Add “whitelisting” functionality to your smart contract that will allow pre-approved wallets to mint a single NFT.
Architect a web solution that integrates with your smart contract’s whitelist.
How will it work?
Generation
Each coupon will be a simple javascript object containing a wallet address that is signed off-chain using a private key that’s only known to us.
Retrieval
Our coupons will live in a simple JSON file, and will be exposed via a simple API.
Consumption
The resulting coupon signature can be used when calling our smart contract to prove that the data being received was generated by us.
Let’s build it
Generation
Let’s start by generating our coupons. We’ll use public-key cryptography to encrypt a wallet address inside our “coupon”.
The script below exposes a createCoupon function that accepts an address and privateKey and will return a coupon.
const { ethers } = require(‘ethers’);

async function createCoupon(address, privateKey) {
    // We’ll leverage the ethers library to create a new wallet
    // that we’ll use to sign the coupon with the private key.
    const signer = new ethers.Wallet(privateKey);

    // We need to encode the wallet address in a way that
    // can be signed and later recovered from the smart contract.
    // Hashing the address using the SHA-256 hashing algorithm
    // is a good way to do this.

    const message = ethers.utils.solidityKeccak256(
        [‘address’],
        [address]
    );

    // Now we can sign the message using the private key.
    const signature = await   signer.signMessage(ethers.utils.arrayify(message));

    // The signature can be expanded into it’s underlying components
    // which we can pass directly into the smart contract.
    // If we didn’t split the signature here — we’d have to do it
    // in the smart contract, which is a bit of a hassle.

    let { r, s, v } = ethers.utils.splitSignature(signature);
    return {r,s,v}
}

module.exports = {
    createCoupon,
}
We’ll need a key-pair to work with — the same one used to deploy your contract will work, but if you still need to generate one you can quickly create a new wallet with Metamask and export the private key from there.
Here’s a small node.js script that will generate our coupons:
const { createCoupon } = require("./coupons");
const fs = require('fs');
require("dotenv").config();// Insert private key corresponding to _couponSigner
const privateKey = process.env.PRIVATE_KEY;// Populate with addresses to whitelist
let addresses = [
    // ..
];const main = async () => {
    let output = [];
    console.log('Generating...');
    for (let i = 0; i < addresses.length; i++) {
        let signature = await createCoupon(addresses[i], 0, privateKey);
        output.push({
            wallet: mint[i],
            r: signature.r,
            s: signature.s,
            v: signature.v
        })
    }// Save the generated coupons to a coupons.json filelet data = JSON.stringify(output);
    fs.writeFileSync('coupons.json', data);
    console.log('Done.');
    console.log('Check the coupons.json file.');};const runMain = async () => {
    try {
        await main();
        process.exit(0);
    } catch (error) {
        console.log(error);
        process.exit(1);
    }
};runMain();
First make sure that you populate your .env file with the private key of the wallet that will be used for signing. Then, populate the addresses array in the script with a list of wallet addresses.
Run node generateCoupons.js to generate and save your coupons to a coupons.json file. Done!
Retrieval
Since each coupon is only valid for a single wallet address, there is no risk if the coupons are exposed. However, for the sake of keeping the whitelist private, it’s still a good idea to hide it behind an API endpoint that responds to a wallet address and returns the corresponding coupon if found.
While writing an API to serve these coupons is beyond the scope of this article, I can show you how easy it would be to use the below code to find and return the right coupon:
// retrieve the wallet from the query wallet
const wallet = req.query.wallet// Find a coupon for the passed wallet address
const c = coupons.filter(coupon => coupon.wallet.toLowerCase() === wallet.toLowerCase())if (0 == c.length) {
    return res.status(200).json({
        coupon: null,
        message: 'Coupon not found'
    })
}return res.status(200).json({coupon: c[0]})
💡 The Next.js framework is an excellent choice to build this API and the remaining front-end minting website.
Consumption
In our smart contract, let’s start by defining a struct to represent our coupon.
struct Coupon {
    bytes32 r;
    bytes32 s;
    uint8 v;
}
You might notice that this already looks like the coupon we generated with Javascript.
In our smart contract, we need to do a couple of things to verify that the coupon is valid.
Create the same message digest (containing the wallet address) that we created in our Javascript code.
Use that message digest to recover the signer of our coupon.
Ensure that the recovered signer is in fact, us.
In Solidity, we can achieve this by writing two internal functions:
// Recover the original signer by using the message digest and
// the passed in coupon, to then confirm that the original
// signer is in fact the _couponSigner set on this contract.function _isVerifiedCoupon(bytes32 digest, Coupon memory coupon)
    internal
    view
    returns (bool)
{
    address signer = ecrecover(digest, coupon.v, coupon.r, coupon.s);
    require(signer != address(0), "ECDSA: invalid signature");
    return signer == _couponSigner;
}// Create the same message digest that we know the coupon created
// in our JavaScript code has created.function _createMessageDigest(address _address)
    internal
    pure
    returns (bytes32)
{
    return keccak256(
        abi.encodePacked(
            "\x19Ethereum Signed Message:\n32",
             keccak256(abi.encodePacked(_address))
        )
    );
}
Then we can update our minting function to use our new coupon system:
function mint(Coupon memory coupon)
    external
    payable
{    require(
        _isVerifiedCoupon(_createMessageDigest(msg.sender), coupon),
        "Coupon is not valid."
    );    // require that each wallet can only mint one token
    require(
        !_mintedAddresses[msg.sender],
        "Wallet has already minted."
    );    // Keep track of the fact that this wallet has minted a token
    _mintedAddresses[msg.sender] = true;    // ...
}
And there we have it! It’s important to keep track of the wallets that have minted in order to prevent coupons from being reused.
On the minting website we need to pass our coupon when calling the mint function:
async function fetchCoupon(wallet) {
    const res = await fetch(`/api/coupons?wallet=${wallet}`)    return await res.json()
}async function mint(wallet) {
    const coupon = await fetchCoupon(wallet)    let tx = await contract.mint(coupon)    // ...}
Conclusion
You’ve learnt a simple, secure and effective method to implement an NFT whitelist.
This article is a specially re-written extract from my upcoming book launch: “A developer’s guide to launching an NFT collection”.
Follow me on twitter for more blockchain-related tips and tricks, and to keep in the loop about the book!
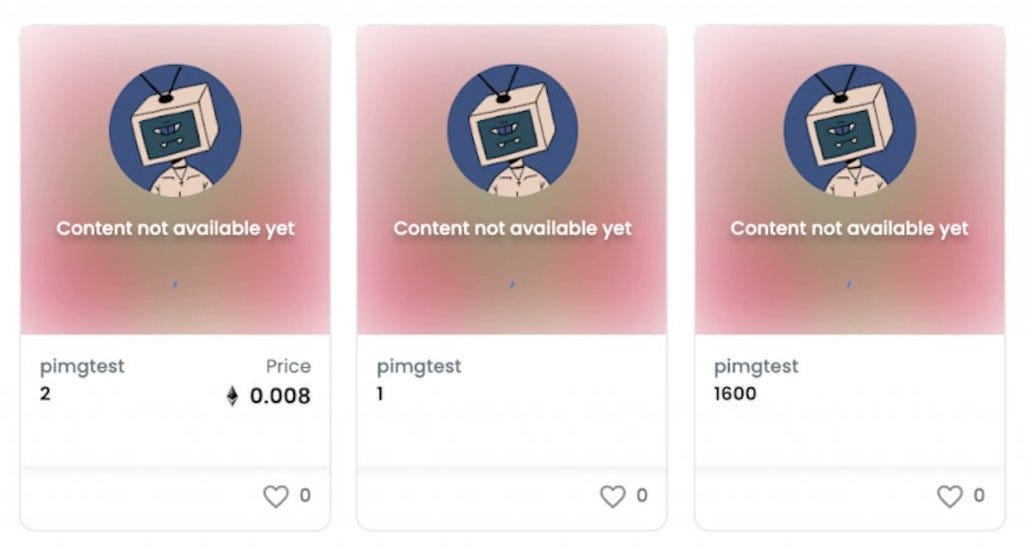
It’s become a common practice when launching a new PFP style NFT collection (a la Bored Ape Yacht Club) to use a placeholder image for every NFT minted, and to only reveal the final NFTs once all NFTs have been minted.
This is an important practice because without it snipers can choose which NFTs to mint based on the rarities of the traits exposed through the metadata.
NFTs with a pre-reveal placeholder image
Before starting to build this feature, let’s expand on our business requirements:
Hide the tokens and metadata until all tokens have been minted
Send a “pre-reveal” version of the token to users once they mint
Allow the contract owner to “reveal” all tokens in the collection
Our smart contract is responsible for returning the URL where each token’s metadata.json file lives.
The way we can solve for the above is to create a “pre-reveal” metadata file and upload it somewhere (e.g.: https://example.org/pre-reveal.json). This “pre-reveal URI” is what we want to return for every token until the reveal takes place.
After the reveal, we want to be able to update the smart contract with a new URL that can be used to generate the correct token URIs. For example, if we’ve uploaded all our tokens to a web-server that responds to https://exmaple.org/tokens/:tokenId, then we’ll want to update the smart contract with our baseURI (https://example.org/tokens/) so that it can easily generate the correct tokenURI by simply appending the token ID to the baseURI.
With this knowledge, we can redefine the problem to more concrete asks of our smart contract:
It should return a generic metadata when the collection is not yet revealed
It should allow the contract owner to update the baseURI
It should return the correct metadata when the token is revealed
How do we implement it?
Let’s assume that we are developing a smart contract for an NFT collection that extends off the usual OpenZeppelin ERC721implementation.
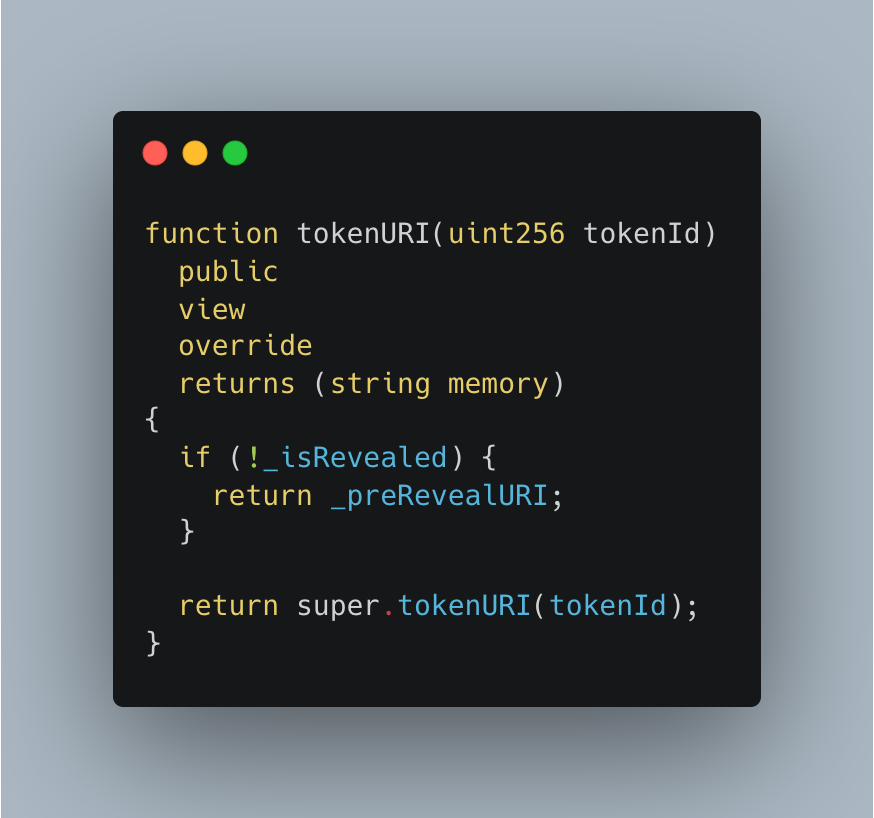
If you inspect the ERC721.sol contract, you’ll find that a tokenURI function is implemented there.
Here it is, for your reference:
OpenZeppelin’s implementation of tokenURI
Their implementation (above) will automatically concatenate the base URI (returned from _baseURI() – which we’ll need to remember for later) with the token ID being retrieved. This is great for AFTER the reveal – but for the pre-reveal we’ll need to override this function to return our pre-reveal URI:
The tokenURI function
You’ll notice that we have a couple of global variables referenced: _isRevealed and _preRevealURI. You can implement these however you like, but at it’s simplest you can simply define them at the top of your contract:
Next we’ll need to create a function to “reveal” the token.
The above reveal function will save the passed baseURI to a global variable called _postRevealBaseURI and will set the _isRevealed boolean to true.
We’re almost done, with the _isRevealed boolean set to true, then the tokenURI function that we wrote earlier will defer to the parent class’ implementation. If you remember, this implementation calls a _baseURI function to retrieve the base URI.
If we inspect that implementation, we can see that it’s actually there to be overridden:
Let’s oblige OpenZeppelin and override the _baseURI function to return the correct base URI!
Conclusion
You’ve learnt a simple, secure and effective method to implement an NFT pre-reveal mechanism.
If you’re using Bitbucket, then using their Pipelines feature as your CI/CD tool is a natural choice. Here’s a pipeline script that I use as a starting point for my new projects.
For every pull request created, the pipeline will perform the following tasks:
Running your test suite.
Ensuring code standards are adhered to.
Running static analysis against your codebase.
The pipeline
Bitbucket Pipelines uses a Docker container under the hood, and is configured by placing a bitbucket-pipelines.yml file in the root folder of your repository.
I’ve got a sample configuration file below, that works for a relatively standard Laravel application.
At the early stages of a tech startup, the amount of DevOps work required is very limited. This makes it unfeasible to get an expert to handle your server and application setup.
A more likely scenario is that you, as tech lead, will need to handle this yourself.
Here’s the strategy I’ve used for many projects over the years. It’s kept the Mindbeat platform running from 2018 till 2022 with 100% uptime (it’s easier than you think).
Simple application server setup
The strategy
Use managed services so that your only point of failure is your application server. Since we use AWS – I used Amazon SQS and Amazon RDS as our managed queue and database.
Use a server management tool in a way that allows you to reproduce your application servers. I use Laravel Forge.
Use a zero-downtime deployment tool in a way that allows you to deploy your latest release at the click of a button. I use Laravel Envoyer.
Set up 2 (identical) application servers to host your application. 2 is infinitely better than 1, and slightly worse than 3. Setting up 2 servers from day 1 means you’ll be ready to horizontally scale to any amount of servers.
When you’re bootstrapped, and don’t have a DevOps resource
When your application is monolithic, or is close to that.
When you can anticipate increased usage and can plan ahead to add more servers to handle the load. (I’ve never had to do this!)
When not to use this strategy
When your application is spread across many services
When your application needs to handle huge spikes in traffic
When your architecture can’t be arranged to only have a single-point of failure that is unmanaged.
Lessons learned
Grant at least one other developer on your team full access to your application servers. You’ll have an amount of team coverage in case you’re ever unreachable and something is breaking.
Spend some time to ensure that Cloudflare’s load balancing features can gauge the health of you application server.
Configure Cloudflare to automatically route traffic away from an unhealthy application server.
Ensure that “Session affinity” is set to “on” in Cloudflare – so that logged in users are routed to the same application server every time.
Don’t bother upgrading your servers. Provision fresh servers and keep your old servers running until you can do a safe changeover.
End
This setup has some hard requirements when it comes to using managed services, and requires your application to be monolithic.
In return you get a hassle-free, developer-friendly setup that you can rely on.
Part of creating a successful Staging and Test environment for your application is generating dummy data as part of your deployment process.
This dummy data is used during development, the QA process and even for feature demos. Making it easy for application states to be achieved with minimal “setup” (that tends to be tedious, data-entry style work) increases productivity of the whole team.
In this article, we will explore two strategies for generating dummy data: using a ‘Dummy Data Seeder’ or ‘Scrambling Production Data’.
Drop your database and seed using this class whenever you want to start from a fresh “state”.
Automate this as part of your post deployment script.
When to use this strategy
When the different states your data can be in is limited.
When it’s easy to recreate states by doing a few manual steps.
When it’s easy for whoever is doing the QA to update the seeder (ideal for when the developers are taking on the QA responsibility).
When not to use this strategy
When there are many different states your data can be in.
When it’s complicated and/or tedious to get the application into a particular state.
When it’s not uncommon to want to recreate a user’s exact state on a test environment in order to better understand the issue.
Lessons learned
When the application was “small”, this strategy was an extremely quick way for developers to get into a productive, working state.
The “DummyDataSeeder” file can quickly and easily become one very long and hard to follow class.
We tried to improve on this strategy by creating a UI + configuration-driven way of seeding different states. Avoid doing this: the configuration file ended up being more complex than what it replaced, rarely worked and wasn’t used.
Scrambling Production Data
This strategy leaves you with dummy data that is almost identical to your production data, except anonymised. For medium to large scale applications – this is well worth the effort.
The strategy
Replicate your production database elsewhere
Iterate over all of your records, and apply a reasonable strategy to anonymise data
Use this database as your staging/test database
Automate this through a command, or as part of your post deployment script.
When to use this strategy
When the data you want to mock is quite complex
When you want to be able to test the exact state that a production user is in, in a test environment
When you expand the team to include a dedicated QA person
When you’d like to test using production data, without any of the risks (and in a GDPR-friendly way)
When not to use this strategy
When the application is small
When the person doing the testing is a developer, and can easily create different states
Lessons learned
Automate this process at the click of a button – this is a task that needs to happen often (at least once per release, and at most – every time a feature branch is deployed to a test or staging environment).
Depending on your strategies for 3rd party integrations your application might have, you may want to disconnect any production accounts as part of the scrambling process.
It’s useful to scramble user emails to match their ID, and to change everyone’s password to something easy to remember.
Test this solution in a real-world environment to avoid surprises (if you’d like to setup an export across servers then you’re going to want to see what the performance of that looks like!)
Update: @PovilasKorop let me know about a couple of packages that help implement this strategy:
This is a reproduction of an article I originally posted on LinkedIn. Please leave any comments on the original LinkedIn article.
As of 3rd July 2018, Malta has become the first country to provide a legal framework for businesses working in the blockchain space. That and the friendly political attitude towards blockchain-based companies means that more foreign companies (like Binance) will set up shop in Malta, more local companies (like Intelliblock) will emerge and more opportunities for blockchain developers & consultants, corporate & legal services and marketing services will be there for the taking.
If you can identify as one of the above services and aren’t sure how to get started in the blockchain industry, then this article is for you – it will explore what services will be required to sustain this new sector.
Who will be regulated by these new bills?
The line between Financial Services and Virtual Financial Assets(VFAs) is an important distinction since only VFAs will be regulated by these new bills. The Malta Financial Services Authority (MFSA) have devised a Financial Instrument Testto help distinguish between the two. The proposed test is thorough, but for the purpose of this article we can casually define VFAs to include all traded cryptocurrencies, brokerages, eWallet providers etc.
Approval of an ICO
The current blockchain and ICO space is littered with scams, making it difficult for consumers to identify legitimate projects. Malta’s new regulatory laws surrounding the launch of ICOs solves this problem by allowing good intentioned companies to be recognised as such by setting up shop in Malta – where they’ll have to acquire a seal of approval for their ICO from the MFSA.
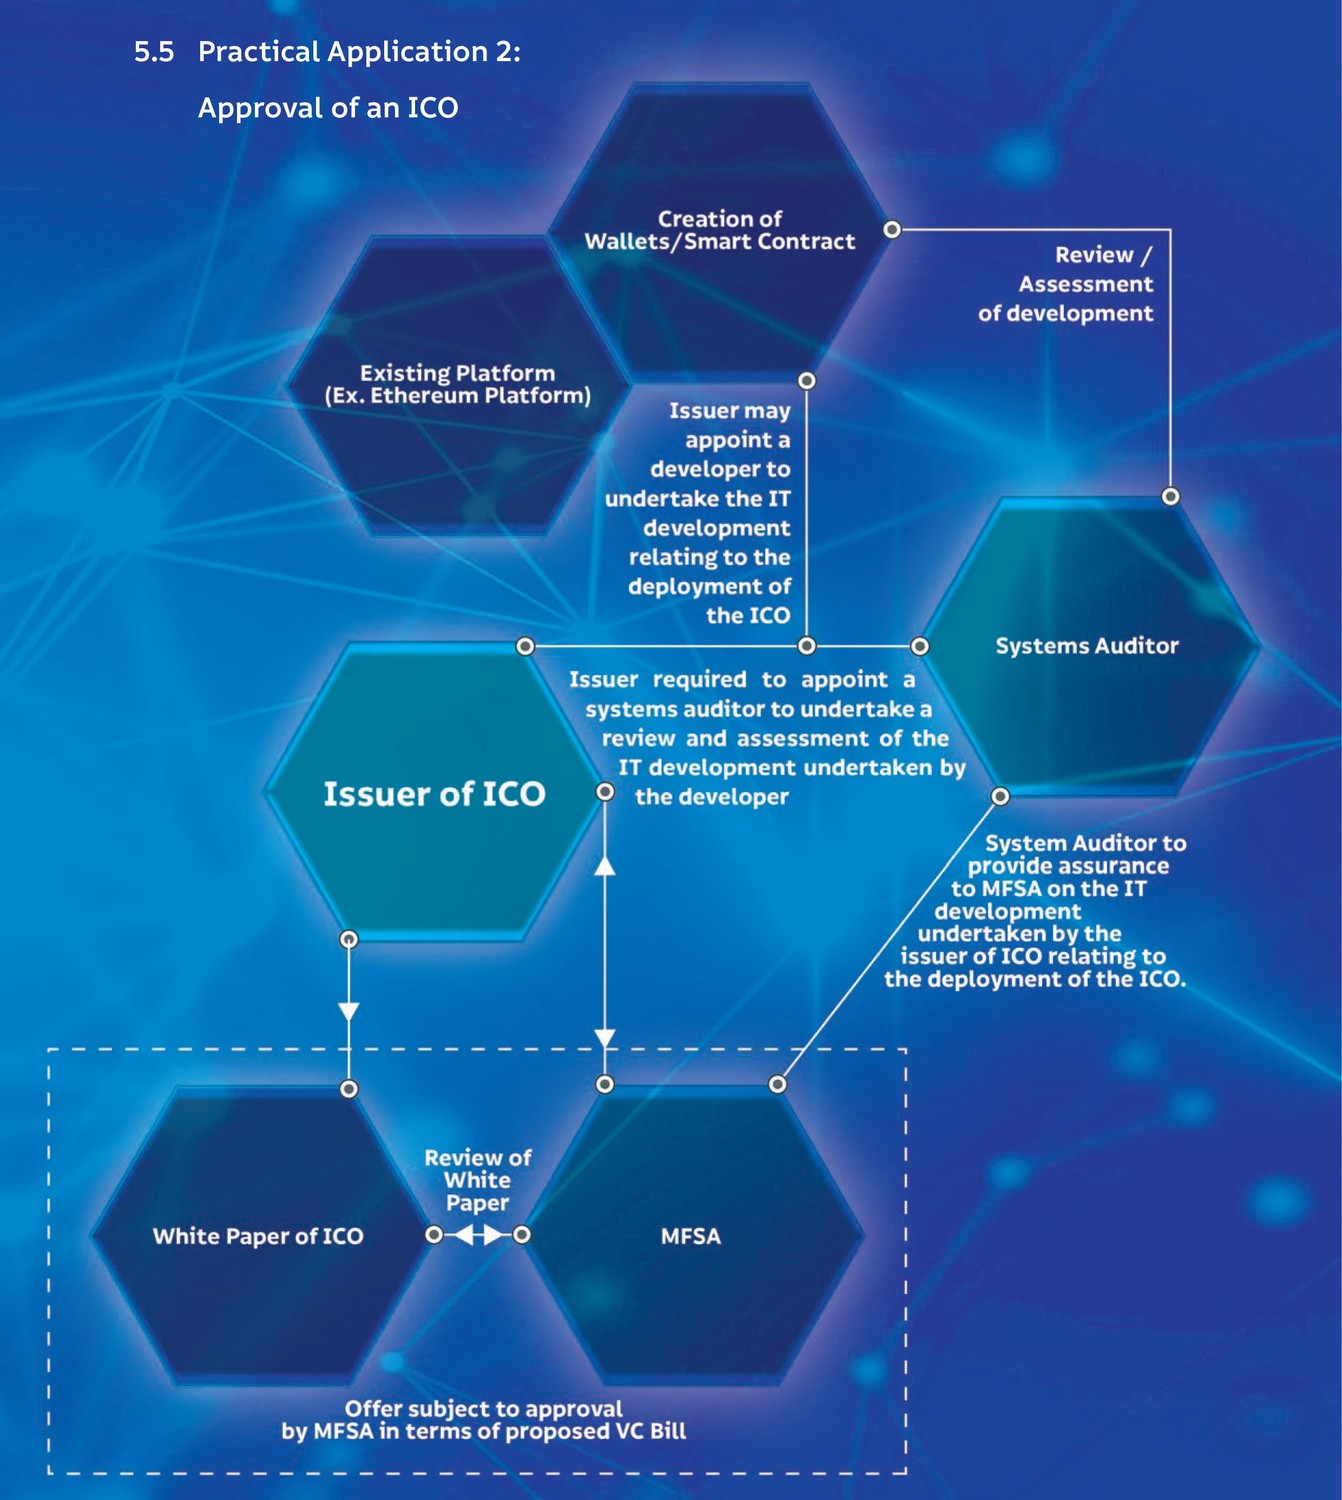
I’ve summarised the process that a company must go through in order to issue an ICO in Malta, below (and have included the flow chart from the “Malta – A Leader in DLT Regulation” document released by the government of Malta).
The Issuer of the ICO employs (or contracts) a blockchain developer to undertake the IT development related to the deployment of the ICO.
The Issuer is required to appoint a Systems Auditor to undertake a review and assessment of the IT development.
The Systems Auditor can act as a consultant during the development process and review and assess the development of smart contracts and/or wallets as they are developed on an existing blockchain platform (e.g.: Ethereum)
The Systems Auditor must provide assurance to MFSA on the IT development undertaken by the Issuer relating to the deployment of the ICO.
The Issuer must provide a White Paper to the MFSA, which must be reviewed and approved (in terms of proposed VC Bill).
From the approval steps above, we can identify a number of services required.
Blockchain Developers and Consultants
ICO issuers won’t necessarily be tech companies and might need to outsource the actual development. Even if the company has an in-house development team, a consultant might still be required to help guide the development team or write the White Paper.
Blockchain Systems Auditors
By law, an external auditor must be appointed in order to obtain approval from the MFSA. The auditor will need to know the ICO regulations inside out and should have the technical expertise necessary to audit the code and oversee the development process.
Certification of a Distributed Ledger Technology (DLT) Platform
DLTs remove the need for a “trusted intermediary” between two parties by introducing the concept of smart contracts to independently ensure that both parties uphold their end of the deal. Smart contracts must be honest, robust and hardened – all aspects that can be verified by a proficient blockchain developer due to the open sourced nature of smart contracts.
Even though it’s possible for anyone to read the code of a smart contract to verify it’s correctness, it’s unfeasible to expect people to do so. Here enters the soon to be created Malta Digital Innovation Authority (MDIA), who will provide DLT platforms certifications denoting that their product has passed the MDIA’s criteria for correctness.
I’ve summarised the process that a company must go through in order to get their DLT platform certified by the MDIA, below (and have included the flow chart from the “Malta – A Leader in DLT Regulation” document released by the government of Malta). Note that in order to make the bill more future proof, the term “Technology Arrangement” is used instead of “DLT Platforms” so as to be able to eventually cover more technologies (like AI).
Employ an Administrator of Technology Arrangements to manage the Technology Arrangement.
The Administrator must seek registration with MDIA.
The Administrator must appoint a System Auditor to undertake a review and assessment of the Technology Arrangement.
The System Auditor must provide assurance to MDIA on the quality and characteristics of the Technology Arrangement.
After being successfully audited, the MDIA will certify the Technology Arrangement.
Apart from the Systems Auditor who would play a similar role as in an ICO approval, you’ll notice the introduction of the new “Administrator of Technology Arrangements” designation. These administrators (like the auditors) are official roles that must be certified in order to be recognised by the MFSA and the MDIA.
Indirect Opportunities
Apart from the skilled workers required to help companies launch ICOs and DLT platforms, a number of other sectors will indirectly benefit from Malta becoming a “Blockchain Island”.
Corporate and Legal Services
Malta currently has one of the most advanced legal frameworks for blockchain based companies making it an attractive place for companies to relocate to or set up shop here from scratch. New companies need to be set up that will also require financial services.
Digital & ICO Marketing
New companies with new products need new customers, acquired through marketing.
Blockchain Strategy Consultants
DLTs are disruptive, since they provide new solutions to old problems – but sometimes it’s hard to see the “DLT” solution. Strategy consultants can help to identify areas in your business that can benefit from DLTs.
With any luck, I’ve been able to shed some light on what the future of the Blockchain Island will bring. If you’re looking for some more inspiration and resources to keep updated in the space, I’ve compiled a short list of people and projects to follow to help you stay connected.
Me – @Michael Stivala. Follow me on twitter for more updates or connect with me on LinkedIn if you’d like to talk about blockchain and setting up in Malta!
Recently I’ve had to interact with a number of SOAP web services, and I’ve come up with some techniques to help build good SOAP web service consumers.
The two most important goals when building a SOAP consumer is for the code to be maintainable and testable.
Dark Beginnings
A natural first approach is to write one class that handles everything necessary to interact with the web service:
<?php

namespace App;

use SoapClient;

class Consumer
{
    protected $client;

    public function __construct($wsdl, $username, $password)
    {
        $this->client = new SoapClient($wsdl, [
            'login' => $this->username,
            'password' => $this->password
        ]);
    }

    public function getBooks()
    {
        $response = $this->client->getBooks();

        // Transform the response as appropriate...

        return $response;
    }
}
What we’ve written above is difficult to test because we’re constructing the SoapClient ourselves. Testing any methods on the consumer would mean making a real call to the web service.
We can do better:
<?php

namespace App;

class Consumer
{
    protected $client;

    public function __construct($client)
    {
        $this->client = $client
    }

    // ..
}
By having the consumer declare outright what it requires to work (an instance of a client) we’re now able to construct the consumer with mock instances of the SoapClient where we can fake real calls to the web service.
Bonus: the consumer is no longer responsible for constructing a SoapClient object with the correct credentials. It’s always a good sign to reduce a class’s responsibilities.
Writing a Test
Now that we have a way to inject a client into our consumer, let’s use Mockery to fake a web service call:
<?php

namespace Tests\Unit\WebServices\Consumer\Methods;

use App\Consumer;
use Mockery as m;
use Tests\TestCase;

class GetBooksTest extends TestCase
{
    /** @test */
    function it_gets_books()
    {
        // Mock the client to return our XML...
        $client = m::mock()
            ->shouldReceive('getBooks')
            ->once()
            ->andReturn(simplexml_load_string($this->getXml()))
            ->getMock();

        // Inject our mock SoapClient into the consumer
        // and make the call that we're testing...
        $response = (new Consumer($client))->getBooks();

        // Assert that the response is what we would expect...
        $this->assertEquals([
            [
                'title' => 'The Alchemist',
            ], [
                'title' => 'Veronica Decides To Die',
            ], [
                'title' => 'The Second Machine Age',
            ],
        ], $response);
    }

    private function getXml()
    {
        return <<<XML
<GetBooksResponse>
    <Books>
        <Book>
            <Title>The Alchemist</Title>
        </Book>
        <Book>
            <Title>Veronica Decides To Die</Title>
        </Book>
        <Book>
            <Title>The Second Machine Age</Title>
        </Book>
    </Books>
<GetBooksResponse>
XML;
    }
}
Since PHP’s SoapClient returns a SimpleXml object from a web service method call, that’s what we’ll have our mock object return too – except we’ll use our predefined XML snippet in order to control our testing environment.
We’re now free to test the response as we sit fit!
Avoiding a 4000 Line Long Consumer Class
As you write more and more code to consume the methods of the web service, your class will quickly grow long. This will happen especially quickly if there is any complex logic associated with formatting web service method requests and responses.
The approach I use to keep classes short is to write one class per web service method. Here’s how:
<?php

namespace App;

use Exception;

class Consumer
{
    protected $client;

    public function __construct($client)
    {
        $this->client = $client
    }

    public function __call($method, $parameters)
    {
        if (! class_exists($class = $this->getClassNameFromMethod($method))) {
            throw new Exception("Method {$method} does not exist");
        }

        $instance = new $class($this->client);

        // Delegate the handling of this method call to the appropriate class
        return call_user_func_array([$instance, 'execute'], $parameters);
    }

    /**
     * Get class name that handles execution of this method
     *
     * @param $method
     * @return string
     */
    private function getClassNameFromMethod($method)
    {
        return 'App\\Methods\\' . ucwords($method);
    }
}
The refactored consumer class now looks for a class in the App\Methods\* namespace with the same name as the method being called. If found, it will create an instance of the class, and delegate to it.
In our example, a call to $consumer->getBooks() would internally be routed to another class called App\Methods\GetBooks .
No matter how many methods we need to consume, our consumer class will never get any bigger!
Bonus: our consumer class now conforms to the Open and Closed principle.
Here’s what our App\Methods\GetBooks class looks like:
<?php

namespace App\Methods;

class GetBooks
{
    protected $client;

    public function __construct($client)
    {
        $this->client = $client;
    }

    public function execute()
    {
        $response = $this->client->getBooks();

        // Transform the response as appropriate...

        return $response;
    }
}
Caching Calls
A common optimization technique is to cache web service calls. With a small tweak to our consumer, we can allow our method classes to be responsible for their own caching:
<?php

namespace App;

use Exception;
use App\Cacheable;

class Consumer
{
    protected $client;

    public function __construct(client)
    {
        $this->client = $client
    }

    public function __call($method, $parameters)
    {
        if (! class_exists($class = $this->getClassNameFromMethod($method))) {
            throw new Exception("Method {$method} does not exist");
        }

        $instance = new $class($this->client);

        if ($instance instanceof Cacheable) {
            return $instance->cache($parameters);
        }

        // Delegate the handling of this method call to the appropriate class
        return call_user_func_array([$instance, 'execute'], $parameters);
    }

    /**
     * Get class name that handles execution of this method
     *
     * @param $method
     * @return string
     */
    private function getClassNameFromMethod($method)
    {
        return 'App\\Methods\\' . ucwords($method);
    }
}
Whenever a method class implements the App\Cacheable interface, the cache method will be called instead. If using Laravel, this could look like the below:
public function cache($parameters)
{
    return app('cache')->remember('Ws.GetBooks', 10, function () use ($parameters) {
        return call_user_func_array([$this, 'execute'], $parameters);
    });
}
Logging Calls
Debugging will be infinitely easier if all your web service calls are logged. Since we’re injecting the SoapClient into our consumer, we can write a simple decorator to log all web service calls:
<?php

namespace App;

use SoapClient;
use Psr\Log\LoggerInterface;

class SoapClientLogger
{
    protected $client;
    protected $logger;

    public function __construct(SoapClient $client, LoggerInterface $logger)
    {
        $this->client = $client;
        $this->logger = $logger;
    }

    public function __call($method, $parameters)
    {
        $response = call_user_func_array([$this->client, $method], $parameters);

        $this->logger->info("Request: {$method}. " . $this->client->__getLastRequest());
        $this->logger->info("Response:", (array) $response);

        return $response;
    }
}
For the request to be logged correctly, we’ll need to enable tracing when configuring our SoapClient:
Of course, we can configure Laravel’s Container to correctly build our consumer class whenever we request it, by writing the following code in a service provider:
Dealing with SOAP web services can be a messy business. Use and improve upon the techniques written here to make the process a little bit more pleasant.
I created a staging environment that I’m proud of, and I’d like to share it with you.
I wanted my staging environment to accomplish two things:
Always show the latest version of the project
Be automatically populated with dummy data
Edit: The “dummy data” strategy described below works great for small projects. For medium to large projects, check out my more recent article Why dummy data matters – and how to generate it.
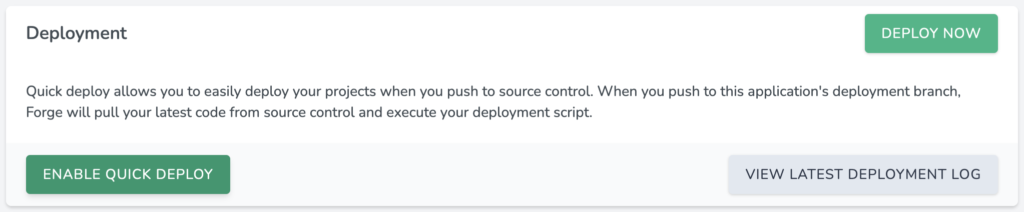
The Staging Server
Accomplishing the above is easy with Forge and Laravel. The first step in setting up your staging server is simply to enable “Quick Deploy” in your app settings page. Any time a specified branch in your git repository is pushed to, Forge will run the deployment script.
Easy. The deployment script is all that remains to configure the staging server. This is what mine looks like:
The line to take note of is the last one. Here we’re telling Laravel to rollback all the migrations before running them all on an empty database. Finally, the –seed flag fills our database with dummy data.
The Application
To enable our staging server set up to be so simple, we need to build our application in a particular way. Luckily, Laravel provides all the tools necessary to do this.
The crux of it is all in the testing environment, and by following the below two rules, you’ll allow yourself to easily create a modern staging server:
Build your database as part of your tests
Don’t rely on real data in your tests
When starting a new Laravel project, one of the first things I do is configure PHPUnit to use an in-memory SQLite database – it’s trivial, add the following lines to the php block in your phpunit.xml configuration file:
Next, in my test classes that require database access, I ensure to pull in the DatabaseMigrations trait provided by Laravel:
<?php

use Illuminate\Foundation\Testing\DatabaseMigrations;

class UserControllerTest extends TestCase
{
    use DatabaseMigrations;
}
The trait ensures that a fresh database is created and migrated before every test executed in that class.
Laravel makes it easy to employ a testing strategy that creates database records on the fly using Model Factories:
/**
 * @test
 */
public function it_indexes()
{
    $users = factory(User::class, 10)->create();

    $this->get('/api/users/');

    foreach ($users as $user) {
        $this->see($user->email);
    }
}
Using this approach, your database/factories/ModelFactory.php file should grow to contain a definition for every model that exists in your application.
It’s an overhead that pays back in dividends!
Your tests returning green will always let you know that your migration files are free from bugs, and that you’re easily able to generate dummy data for you application.
The final step is to actually seed the database. At this stage, it should be very easy to use Laravel’s in-built helpers to generate Seeder classes where you can use the familiar factory method to insert dummy records into the database. You can craft the seed data in any way you like – what I’ve found that works best is to try to include as much “real looking” data as possible.
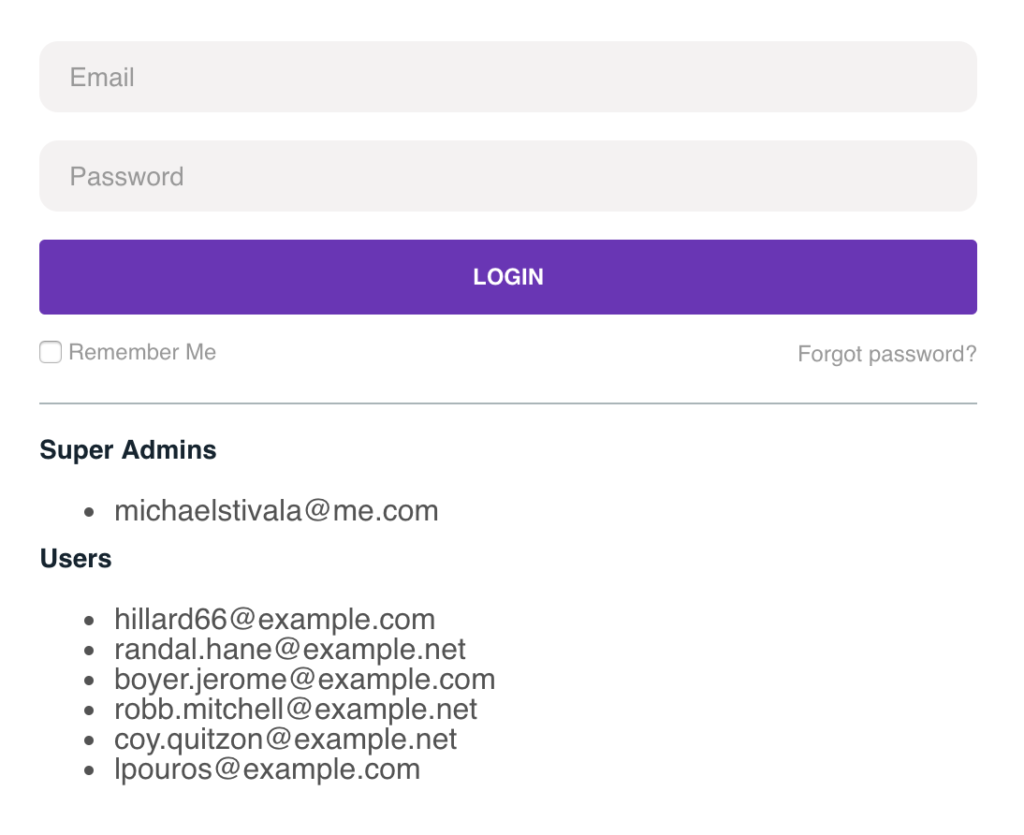
Here’s an example of how I seed the super administrator users into the database:
<?php

use App\Entities\User;
use Illuminate\Database\Seeder;

class SuperAdminSeeder extends Seeder
{
    /**
     * Run the database seeds.
     *
     * @return void
     */
    public function run()
    {
        collect(User::$superAdmins)->each(function ($email) {
            factory(User::class)->create([
                // We'll try to derive a name from the e-mail address
                'name' => ucwords(str_replace('.', ' ', explode("@", $email)[0])),
                'email' => $email,
            ]);
        });
    }
}
Wrapping Up
With a few lines of code you can display a list of users on the login page (not to be shown on production!) to make it easy for product owners to grab an e-mail and login with a dummy account:
Let me know if you have any other tips for crafting your staging environment in the comments!