I created a staging environment that I’m proud of, and I’d like to share it with you.
I wanted my staging environment to accomplish two things:
Always show the latest version of the project
Be automatically populated with dummy data
Edit: The “dummy data” strategy described below works great for small projects. For medium to large projects, check out my more recent article Why dummy data matters – and how to generate it.
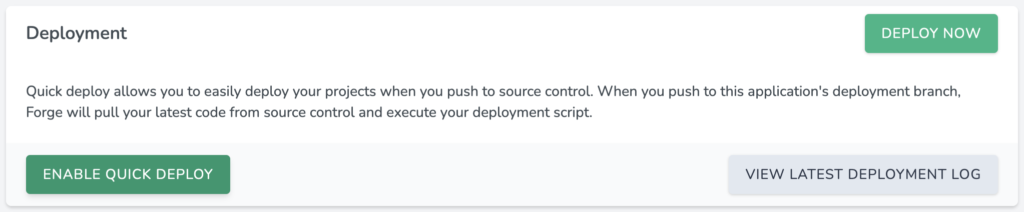
The Staging Server
Accomplishing the above is easy with Forge and Laravel. The first step in setting up your staging server is simply to enable “Quick Deploy” in your app settings page. Any time a specified branch in your git repository is pushed to, Forge will run the deployment script.
Easy. The deployment script is all that remains to configure the staging server. This is what mine looks like:
The line to take note of is the last one. Here we’re telling Laravel to rollback all the migrations before running them all on an empty database. Finally, the –seed flag fills our database with dummy data.
The Application
To enable our staging server set up to be so simple, we need to build our application in a particular way. Luckily, Laravel provides all the tools necessary to do this.
The crux of it is all in the testing environment, and by following the below two rules, you’ll allow yourself to easily create a modern staging server:
Build your database as part of your tests
Don’t rely on real data in your tests
When starting a new Laravel project, one of the first things I do is configure PHPUnit to use an in-memory SQLite database – it’s trivial, add the following lines to the php block in your phpunit.xml configuration file:
Next, in my test classes that require database access, I ensure to pull in the DatabaseMigrations trait provided by Laravel:
<?php

use Illuminate\Foundation\Testing\DatabaseMigrations;

class UserControllerTest extends TestCase
{
    use DatabaseMigrations;
}
The trait ensures that a fresh database is created and migrated before every test executed in that class.
Laravel makes it easy to employ a testing strategy that creates database records on the fly using Model Factories:
/**
 * @test
 */
public function it_indexes()
{
    $users = factory(User::class, 10)->create();

    $this->get('/api/users/');

    foreach ($users as $user) {
        $this->see($user->email);
    }
}
Using this approach, your database/factories/ModelFactory.php file should grow to contain a definition for every model that exists in your application.
It’s an overhead that pays back in dividends!
Your tests returning green will always let you know that your migration files are free from bugs, and that you’re easily able to generate dummy data for you application.
The final step is to actually seed the database. At this stage, it should be very easy to use Laravel’s in-built helpers to generate Seeder classes where you can use the familiar factory method to insert dummy records into the database. You can craft the seed data in any way you like – what I’ve found that works best is to try to include as much “real looking” data as possible.
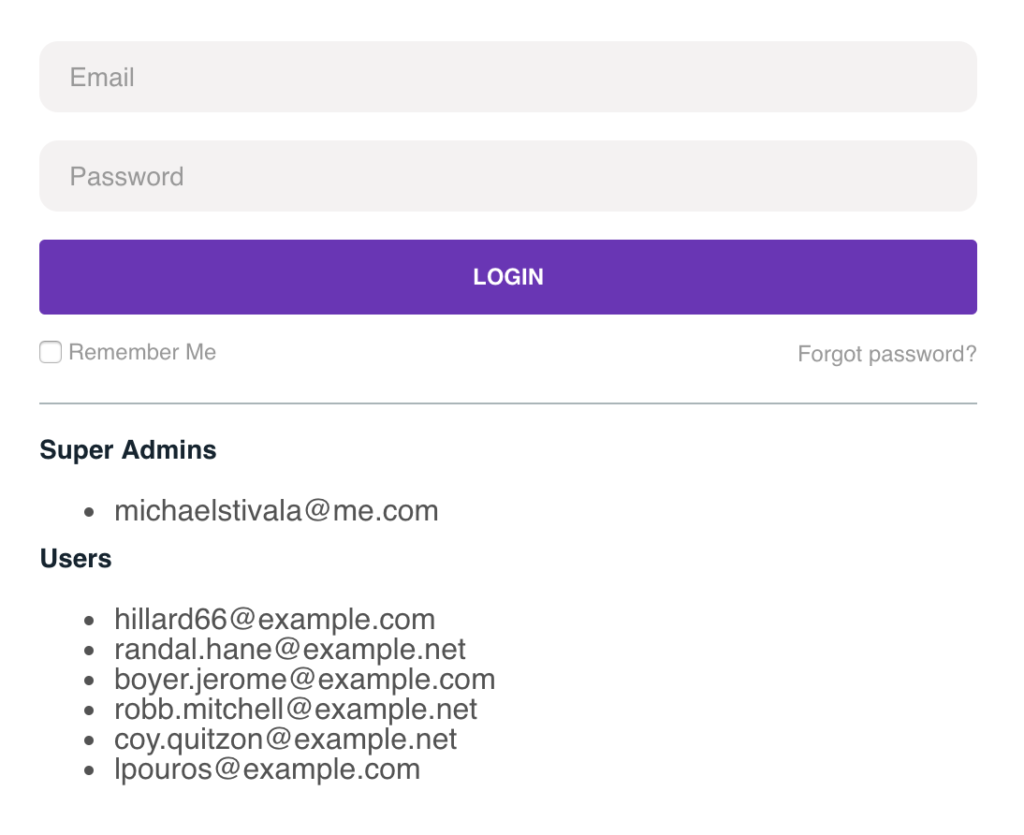
Here’s an example of how I seed the super administrator users into the database:
<?php

use App\Entities\User;
use Illuminate\Database\Seeder;

class SuperAdminSeeder extends Seeder
{
    /**
     * Run the database seeds.
     *
     * @return void
     */
    public function run()
    {
        collect(User::$superAdmins)->each(function ($email) {
            factory(User::class)->create([
                // We'll try to derive a name from the e-mail address
                'name' => ucwords(str_replace('.', ' ', explode("@", $email)[0])),
                'email' => $email,
            ]);
        });
    }
}
Wrapping Up
With a few lines of code you can display a list of users on the login page (not to be shown on production!) to make it easy for product owners to grab an e-mail and login with a dummy account:
Let me know if you have any other tips for crafting your staging environment in the comments!
Amo really nailed the functionality here – but I think the final class presented could use some of Adam’s magic to make it just a little bit better. Let’s be honest – I’ve just been looking for an excuse to try out some of Adam’s techniques…
Below is the original class, and then my refactors.
<?php

namespace App\UserSearch;

use App\User;
use Illuminate\Http\Request;
use Illuminate\Database\Eloquent\Builder;

class UserSearch
{
    public static function apply(Request $filters)
    {
        $query =
            static::applyDecoratorsFromRequest(
                $filters, (new User)->newQuery()
            );

        return static::getResults($query);
    }

    private static function applyDecoratorsFromRequest(Request $request, Builder $query)
    {
        foreach ($request->all() as $filterName => $value) {

            $decorator = static::createFilterDecorator($filterName);

            if (static::isValidDecorator($decorator)) {
                $query = $decorator::apply($query, $value);
            }

        }
        return $query;
    }

    private static function createFilterDecorator($name)
    {
        return return __NAMESPACE__ . '\\Filters\\' .
            str_replace(' ', '',
                ucwords(str_replace('_', ' ', $name)));
    }

    private static function isValidDecorator($decorator)
    {
        return class_exists($decorator);
    }

    private static function getResults(Builder $query)
    {
        return $query->get();
    }
}
Removing Static
Since all methods in this class are static, we can’t keep track of state. We end up passing around the variables that we’re using (the Request and Builder in this instance) to every method.
By adding a private constructor, we can keep the Api of the class the same, but internally gain the benefits of working with an object!
protected $filters;
protected $query;

private function __construct(Request $request, Builder $query)
{
    $this->filters = collect($request->all());
    $this->query = $query;
}

public static function apply(Request $request)
{
    return (new self($request, User::query())->applyFilters()->getResults();
}
I’ve refactored the apply method to create a new instance of the object, and then call the appropriate methods to return the desired results. Since we don’t need the actual Request object anywhere else, I’ve gone ahead and created a collection out of the inputs for future use.
Introducing a Null Object
Currently we’re looping through the request inputs, and checking to see if we can find an existing filter to apply:
foreach ($request->all() as $filterName => $value) {

    $decorator = static::createFilterDecorator($filterName);

    if (static::isValidDecorator($decorator)) {
        $query = $decorator::apply($query, $value);
    }
}
One way to get rid of that conditional is by introducing a null object that effectively accepts the query, but does nothing with it.
private function getFilterFor($name)
{
    $filterClassName = $this->createFilterDecorator($name);

    if (! class_exists($filterClassName)) {
        return new NullFilter;
    }

    return new $filterClassName;
}
The above method allows us to refactor the applyDecoratorsFromRequest method (that I’ve renamed to applyFilters) into the following:
Since our filters are now a collection, we have access to the each method which I’ve used here instead. The getFilterFor method will always return a valid class that we can use – even if it is just a null object – allowing us to forego any conditionals!
I’m returning $this just for convenience’s sake to allow me to chain my method calls.
Alternatively…
A refactor to my own method getFiltersFor could also more heavily make use of collections, and we can end up with a solution that completely eliminates loops and conditionals:
private function getFilterFor($name)
{
    return $this->filters->map(function ($value, $filterName) {
        return $this->createFilterDecorator($filterName);
    })->filter(function ($filterClassName) {
        return class_exists($filterClassName);
    })->map(function ($filterClassName) {
        return new $filterClassName;
    })->get($name, new NullFilter);
}
We’ve reworked the flow to do the following:
Map all filter names to class names
Filter out class names that aren’t implemented
Map all class names into new instances
Get the appropriate filter object, or return a new NullFilter if it doesn’t exist
In this case it’s debatable as to whether this second refactor adds any value – but an interesting solution nonetheless.
Moving On
For those who suffer from long and complicated index methods on your controllers, I urge you to read the original article by Amo.
As a side note, all of the refactors that I performed on the class (creating a private instance, introducing a null object, and refactoring to collections) were all lessons learned from Adam Wathan’s Refactoring to Collections book.
Learning about immutable objects improved my PHP code thoroughly. I’ve listed some helpful resources below that really helped me grasp the concept of immutability and value objects.
As a quick example, if your code sometimes looks like this:
<?php

class Weather
{
    protected $region;

    public function setRegion($region)
    {
        $this->region = $region;
    }

    private function getRegion()
    {
        if (! $this->region) {
            throw new RegionNotSetException;
        }
    }

    public function doSomething()
    {
        $region = $this->getRegion();

        // ...
    }
}
When it should be looking (more) like this:
<?php

class Weather
{
    protected $region;

    public function __construct($region)
    {
        $this->region = $region;
    }

    public static function fromRegion($region)
    {
        return new self($region);
    }

    public function doSomething()
    {
        $region = $this->region;

        // ...
    }
}
Then I urge you to read up on immutable objects. Below are some of the articles that I found most helpful.
The Fowler Money Pattern
Here’s a very well written article, using Money as an example of an object that should be immutable.
Philip Brown wrote a very good explanation highlighting the differences between Entities (which are what your regular Laravel models are) and Value Objects. A real eye opener.
I’m been doing a lot of development in Vue.js recently, though I’ve never worked towards immutability in javascript. The article linked is an interesting read, and led me to discover immutability.js – a library created by Facebook with a number of immutable data structures.
I wonder – does anyone have any experience in working with immutability in javascript with Vue.js or other similar frameworks? I’d be interested to hear your thoughts on the subject in the comments.
The $handlerStack will eventually hold the middleware that handles the logging.
Setting up the log file
Before I can set up the middleware, I need to instantiate something that handles writing our log messages to file. I’ll use the Monolog package to handle this – it makes it easy to achieve my desired criteria of having a daily log file next to my default laravel.log.
In my AppServiceProvider I’ll set up a helper function to create the logger:
private function getLogger()
{
    if (! $this->logger) {
        $this->logger = with(new \Monolog\Logger('api-consumer'))->pushHandler(
            new \Monolog\Handler\RotatingFileHandler(storage_path('logs/api-consumer.log'))
        );
    }

    return $this->logger;
}
Setting up the middleware
Guzzle’s logging middleware requires a logger (that I’ve just created above) and a MessageFormatter instance that controls what gets logged.
I’ll set up a helper function to create the middleware:
private function createGuzzleLoggingMiddleware(string $messageFormat)
{
    return \GuzzleHttp\Middleware::log(
        $this->getLogger(),
        new \GuzzleHttp\MessageFormatter($messageFormat)
    );
}
The $messageFormat is a string that “Formats log messages using variable substitutions for requests, responses, and other transactional data.” Possible substitutions can be seen here – but I’ve come up with some handy ones:
Logging the request: {method} {uri} HTTP/{version} {req_body} Logging the response: RESPONSE: {code} – {res_body}
Creating the HandlerStack
Now that I have a way to easily new up an instance of Guzzle’s logging middleware, I can create a new HandlerStack to push the middleware onto:
I decided to log the request and response in two separate log entries. It seems like the only way to accomplish this is to push multiple logging middlewares to Guzzle, so I set up a helper function to create a HandlerStack with all the required logging middleware from an array of message format strings that I would like to log.
private function createLoggingHandlerStack(array $messageFormats)
{
    $stack = \GuzzleHttp\HandlerStack::create();

    collect($messageFormats)->each(function ($messageFormat) use ($stack) {
        // We'll use unshift instead of push, to add the middleware to the bottom of the stack, not the top
        $stack->unshift(
            $this->createGuzzleLoggingMiddleware($messageFormat)
        );
    });

    return $stack;
}
And there we have it! Now, adding multiple loggers to our Guzzle Client is as easy as the code below:
But it turns out that this gets the “remaining contents of the body as a string” – and since the middleware already accessed the body in order to log it, there isn’t any content remaining to retrieve.
The correct way to access the response content is to cast the body to a string:
This is a technique that I recently found useful. Eloquent models allow you to specify a custom collection object to be returned – which sometimes can be a great place to put some business logic.
While refactoring WhichBeach, I used a custom collection to move some logic from the Beach model to a custom BeachCollection. This allowed me to test the logic in isolation.
Creating the Custom Collection
I created a new class extending Laravel’s Eloquent Collection:
<?php

namespace WhichBeach\Beach\Support;

use Illuminate\Database\Eloquent\Collection;

class BeachCollection extends Collection
{

}
In my model, I instructed Laravel to use my custom collection:
<?php

namespace WhichBeach\Beach\Entities;

use WhichBeach\BaseModel;
use WhichBeach\Beach\Support\BeachCollection;

class Beach extends BaseModel
{
    /**
     * Create a new Eloquent Collection instance.
     *
     * @param  array  $models
     * @return \WhichBeach\Beach\Support\BeachCollection
     */
    public function newCollection(array $models = [])
    {
        return new BeachCollection($models);
    }
}
Adding the Logic
Now that I had a place to put my custom code, I could add any number of helper methods to be used throughout my application:
/**
 * Filter the beaches to only contain major beaches
 *
 * @return static
 */
public function major()
{
    return $this->where('is_major', true);
}

/**
 * Filter the beaches to only the ones that have the lowest score
 *
 * @return static
 */
protected function lowestScoring()
{
    return $this->where('score', $this->min('score'));
}
Edit: The above code block has been improved after an excellent suggestion by Joseph Silber in the comments.
This has given me the ability to write more fluent code when dealing with beaches:
Today I learned about Salmon Cannons. Salmon have evolved to swim up river to spawn, but the introduction of dams has created a sometimes impossible obstacle for salmon to overcome.
A clever solution has been found in the way of the Salmon Cannon – a slippery tube that sucks salmon over obstacles so that they can continue their journey upstream.
The Salmon Cannon is a solution to a problem that the world found itself in – Salmon could no longer swim upstream because they were blocked by the dams. Human beings – being the creative and pragmatic bunch that we are – found a creative and ingenious solution to the problem at hand.
As developers we’re problem solvers, and building the code equivalent of a Salmon Cannon is something that we do on a daily basis.
We find ourselves in the middle of a problem – a challenge, even – and we do what we do best. We code our way out of it. It’s natural.
But… on further thought – the Salmon Cannon isn’t the ultimate solution. The problem that we were given was How can we help Salmon with their journey upstream – when dams are blocking their way? We’ve solved that.
But maybe a better approach would have been to stop, and consider the possibility Do we still need the dam, or can we just remove it? Sure – sometimes this is out of the question, but in reality – sometimes this really is the solution.
I see this in development all the time. Developers find themselves a problem – and they try dozens of ways of solving it – never stopping to think why they’ve found themselves in that predicament in the first place. I’ve found that so many times the solution to a problem is to change it.
Coding without thought is a hard vice to break – but once you do, you’ll find yourself producing solutions that you can look back on and be proud of.
Don’t be a Salmon Cannon builder, be a dam destroyer!
I’m the proud owner of WhichBeach – the website that tells you which beach is best to visit (in Malta) based on the weather, updated hourly.
As I’m picking up the codebase ahead of this Summer’s updates, I can’t help but review and refactor the existing code. It’s interesting to dissect previous design decisions. Also, I’ve learnt so much in the last year that it’s only natural for me to want to bring the standard of an older project up a bit.
Here’s a list of things that I used to do, that aren’t cool now.
I used to not have a coding style guide
I was blissfully unaware that coding style guides even existed! Sure – I had my own patterns that I tried to stick to, but they weren’t enforced.
The solution to this one is easy – I’ve already converted the codebase to PSR-2 – though it was somewhat of a manual process of opening each file and running the PHP Coding Standards Fixer. I’m sure there’s a quicker way through the terminal that I’m not aware of – perhaps someone can enlighten me in the comments.
Edit:
Julio pointed out in the comments that the command to convert your files to PSR-2 is the following:
php-cs-fixer fix --level=psr2 path-to-your-files/
Thanks Julio!
I used to group my files by layer
I organised my code into top level folders like:
Handlers
Helpers
Interfaces
Listeners
Observers
Queues
I’m sure it felt like I was being organised while I was doing it, but it turned out to be highly impractical: you can’t glance at a folder (say “Beaches”) and get an overview of all that business logic that is associated to Beaches – the logic is scattered across different parts of the system.
Also, looking inside these Layer folders, you find code that is quite unrelated to each other, and unlikely to be used together.
I’ve recently been experimenting with Vue and Vueify – the approach taken there is that since the Javascript and Html work so closely together… put them in the same file!
A more general rule might be: Code that works together should be kept together.
The solution to this problem is to carefully refactor and reorganise my code structure.
I used to code without automated tests
I’m scared to change any of the core logic of this project! Sometimes I have to pull in live data to see how the system reacts! I can’t test drive anything!
These are all fears that I used to live without, but haunt me today. A slight exaggeration – yes, but legitimate concerns when moving forward with the project.
The solution is in the works. I’ve set up a testing environment with an in memory database, and have started adding tests to existing functionality. I’m refactoring along the way using the Test Driven approach.
My predicament? Should I first add as many tests as possible to the existing codebase, and then refactor? Or should I refactor as I write the tests, so that the first time the test is written, it changes the code to be inline with my new rules of development? I’m leaning towards the second option, but I have my doubts.
I used to do a lot of image manipulation myself
This stuff is hard. Yes, I used available packages that handled the image manipulations, but I still had to handle a lot of the logic myself.
At the moment, the payoff isn’t worth the work and maintenance. My solution is to get rid of most of my Image related logic, and instead use Spatie’s wonderful Media Library Package. I use it for a number of other projects and it fits the bill perfectly.
I used to have self validating models
A couple of years ago, this seemed to be the thing to do – but I’ve been bitten by this approach a couple of times.
Using Laravel’s Form Request Validation is a good way to get some code out of my Models (the validation rules) and Controllers (the validation logic).
I used to have an administration area
This isn’t a “bad decision” per se – but it doesn’t align with my plans for the future – which is to be a user powered app where logged in users are enabled to do things like add new beaches, comments and reviews.
The solution? Rip out all the administration area! (Yikes!) Then, slowly test drive the front-end driven way to get data into the website from logged in users. I’ll still need to have an authorization system where some content is only editable by administrators – but the idea is to have a lot of user driven content.
Let me know in the comments if you’ve had experience with this before!
The above is a rough game plan for the future of WhichBeach, and a reminder that as developers we’re always evolving!
I want to be able to set the selected tag from my parent instance. This works fine using the code above – the problem occurs when the current tag_id is not set in my store object.
When the tag_id is not set in my store object, I want my component to default to the “Choose…” option.
Digging Deeper
When the tag_id is not defined in my store object, it’s being set as null on my component. I thought this was what I wanted, but this does not select the “Choose..” option by default since the Html value of the option is an empty string. What I actually want is the tag to explicitly be an empty string when it isn’t set.
The Solution
While I could probably perform a quick check when including my component and do something like the following:
It doesn’t solve the problem if this component is going to be included in many places. It also makes my component somewhat brittle since it relies on being instantiated in a particular way.
Instead, I resorted to setting a default value for my “tag” prop. This default value is used when the :tag prop isn’t passed, or is null – just what I wanted!
The code to set a default value to the prop is lifted from the vue.js documentation:
Last weekend I chose to develop an SPA (single-page application) written in Laravel and Vue.js in order to promote the launch of my band Stalko’s second album.
Share the song with friends in a fun way by typing in their name and a personalised message
Create a custom URL that users can send to their friends for them to read their message
Let the user choose what language to create their ‘share’ experience in (English or Maltese)
I also set myself some personal goals:
Test drive the application – a skill that I’ve been working on in PHP for the last year or so.
Use Vue’s router library to build my first SPA
Become more familiar with Vue in general
Planning It
It’s important to analyse the brief and translate it to technical terms that you can work with.
I want my users to be able to make a personalised experience for their friends, so that when visiting the website it would greet them with a message, and a Stalko song. Users would then be encouraged to create and share a personalised experience for one of their friends, and to buy tickets to our album launch. Hopefully this will create a viral loop where invited users will share to their friends.
Also – I decided to spice things up by allowing users to choose the language of their share.
I need to model this behaviour. To do so, I’ll store the locale, name and message of each Share. To allow my SPA to preview and store each Share I’ll set up a couple of Api endpoints.
Setting up
Setting up is quick and easy when using Laravel’s installer with Homestead:
laravel new stalkoshare
I set up my hosts file:
sudo nano /etc/hosts
by adding one line to it:
192.168.10.10 stalkoshare.app
Getting to work
I need to develop a simple API that my client side javascript can consume in order to create Shares.
The Laravel make:test command generates a boilerplate test class:
php artisan make:test ShareControllerTest
I can now put tests in my new ShareControllerTest file, and run them from terminal with a single line:
vendor/bin/phpunit
I want to be able to post to the /shares endpoint in order to create a new Share resource. I want to make sure that only valid requests will filter down to my ShareController. It’s often tempting to jump ahead when writing tests, because through experience we can sometimes predict how the eventual test should look:
/**
 * @test
 */
public function it_validates_share()
{
    $this->json('POST', '/shares', [

    ])->seeJsonStructure(['name', 'message', 'locale']);

    $this->assertResponseStatus(422);
}
But by doing that, you aren’t “driving” the development through the tests, since the code isn’t evolving naturally due to the test. A better approach is to remember Uncle Bob’s rule:
You are not allowed to write any more of a unit test than is sufficient to fail.
So an appropriate first test would be more like:
/**
 * @test
 */
public function it_responds_to_shares_store_endpoint()
{
    $this->json('POST', '/shares', [

    ]);
}
This fails.
PHPUnit 4.8.23 by Sebastian Bergmann and contributors.

F

Time: 1.21 seconds, Memory: 12.00Mb

There was 1 failure:

1) ShareControllerTest::it_responds_to_shares_store_endpoint
Expected status code 422, got 404.
Failed asserting that 404 matches expected 422.
The failing test drives my next piece of code, which is to fix the 404 error that I’m receiving. I don’t have any routes for my application to respond to – hence the 404:
Running the test again now will result in a 500 error – something to be expected since I haven’t created the ShareController yet. I can do that easily with Laravel:
php artisan make:controller ShareController
For now I’ll create an empty store method in my new controller, and run the test again:
PHPUnit 4.8.23 by Sebastian Bergmann and contributors.

F

Time: 1.55 seconds, Memory: 12.00Mb

There was 1 failure:

1) ShareControllerTest::it_responds_to_shares_store_endpoint
Expected status code 422, got 200.
Failed asserting that 200 matches expected 422.
We’re not doing anything inside the method, and as a result Laravel automatically is returning a 200 response for us. Let’s change that by leveraging Laravel’s Form Request Validation:
php artisan make:request StoreShareRequest
We can add validation rules inside this request object:
/**
 * Determine if the user is authorized to make this request.
 *
 * @return bool
 */
public function authorize()
{
    return true;
}

/**
 * Get the validation rules that apply to the request.
 *
 * @return array
 */
public function rules()
{
    return [
        'name' => 'required',
    ];
}
To instruct Laravel to validate using this object when trying to store a Share, we type hint the store method on our ShareController:
public function store(StoreShareRequest $request)
{
    //
}
Our test passes now!
PHPUnit 4.8.23 by Sebastian Bergmann and contributors.

.

Time: 1.32 seconds, Memory: 12.00Mb

OK (1 test, 1 assertion)
We can make it fail again by testing for the appropriate Json response:
/**
 * @test
 */
public function it_validates_share()
{
    $this->json('POST', '/shares', [

    ])->seeJsonStructure(['name', 'message', 'locale']);

    $this->assertResponseStatus(422);
}
We’ve returned to our initial prediction of how the first test might look, but we’ve test driven our production code to this point – great! We can fix our now failing test by simply adding the appropriate validation rules in our StoreShareRequest.
public function rules()
{
    return [
        'name' => 'required',
        'message' => 'required',
        'locale' => 'required|in:en,mt',
    ];
}
Great. It’s time to actually save the Share now.
/**
 * @test
 */
public function it_saves_share()
{
    $this->json('POST', '/shares', [
        'name' => 'Paul',
        'message' => 'I heard you were stuck at home studying :(',
        'locale' => 'en',
    ]);

    $this->assertResponseStatus(200);

    $this->seeInDatabase('shares', [
        'name' => 'Paul',
        'message' => 'I heard you were stuck at home studying :(',
        'locale' => 'en',
    ]);
}
By passing a a request that will pass validation, the control of the application now resides inside the ShareController::store method. This test will fail until we add the code to persist the Share.
Let’s start by creating the appropriate migration and model:
public function up()
{
    Schema::create('shares', function (Blueprint $table) {
        $table->increments('id');
        $table->string('name');
        $table->text('message');
        $table->string('locale');
        $table->timestamps();
    });
}
And we can pop in the line that will save our Share to the database.
public function store(StoreShareRequest $request)
{
    Share::create($request->all());
}
Don’t forget to enable database migrations when testing by adding the following use statement:
use Illuminate\Foundation\Testing\WithoutMiddleware;
use Illuminate\Foundation\Testing\DatabaseMigrations;
use Illuminate\Foundation\Testing\DatabaseTransactions;

class ShareControllerTest extends TestCase
{
    use DatabaseMigrations;

    // ..
We’ll run the tests again.
PHPUnit 4.8.23 by Sebastian Bergmann and contributors.

F

Time: 1.41 seconds, Memory: 12.00Mb

There was 1 failure:

1) ShareControllerTest::it_saves_share
Unable to find row in database table [shares] that matched attributes [{"name":"Paul","message":"I heard you were stuck at home studying :(","locale":"en"}].
Failed asserting that 0 is greater than 0.
A common mistake – we’ve forgotten to set up our fillables property on the Share model:
Now that we’re passing again, we can continue fleshing out our test.
It’s good to have a deep understanding of what we want to happen first: when a user creates a new Share we want to present them with a Url that they can then share with their friends.
Let’s translate that intent and add it to our test.
/**
* @test
**/
public function it_saves_share()
{
    $this->json('POST', '/shares', [
        'name' => 'Paul',
        'message' => 'I heard you were stuck at home studying :(',
        'locale' => 'en',
    ])->seeJson([
        'url' => route('shares.show', 1)
    ]);

    $this->assertResponseStatus(200);

    $this->seeInDatabase('shares', [
        'name' => 'Paul',
        'message' => 'I heard you were stuck at home studying :(',
        'locale' => 'en',
    ]);
}
Running this test the first time will result in an error – the route shares.show isn’t defined, and so the test throws an error. This is a common scenario where you first need to work on getting your tests to fail instead of throwing an error before you can make them pass.
Now the test fails. Let’s make it pass by adjusting the response:
public function store(StoreShareRequest $request)
{
    $share = Share::create($request->all());

    return response()->json([
        'url' => route('shares.show', $share->id)
    ]);
}
Fast Forwarding
There’s some other functionality that needs to be added before we can move on to the front end. To avoid this post from getting too long, I’m going to highlight what was done and leave the source code up for your perusal:
Make the application respond to the shares.show route to display the customized share message
Make the application respond to a share-previews.store endpoint to allow my javascript Api consumer to generate a preview of what their share message will look like to their friend.
Make the homepage respond to a default Share
The Front End
I was really excited to jump into creating my first SPA with Vue. Even though I’ve used Vue for a number of projects – I’ve never invested the time to become really comfortable with it. My goal is to develop something that I can come back to a months from now and be able to quickly understand what’s going on.
I’ll start by pulling in Vue, Vue Resource, and Vue Router via npm.
npm install vue vue-resource vue-router --save
I decided to use browserify for two reasons. First is the ability to use the latest features of Javascipt. Second, browserify allows you to require javascript files into others allowing me to organise my Javascript in a modular fashion.
I’d like to go over some of the concepts that I used, and the tricks that helped me level up my Vue game.
First, let’s set up the boilerplate to at least get a screen going where we can see the homepage!
I’ve setup my app.js to allow Vue’s router to take control of the homepage, and to pass that control to a Vue component.
var Vue = require('Vue');
var VueRouter = require('vue-router');
Vue.use(VueRouter);
Vue.use(require('vue-resource'));

var router = new VueRouter();

router.map({
    '/': {
        component: Vue.extend(require('./components/submission.js')())
    }
})

router.start(Vue.extend({}), '#app');
The component is extremely basic, and simply renders the template defined:
We need to make a few adjustments to the Html too:
<body id="app">
    <router-view></router-view>
    <template id="submission">
        <h1>Hey {{ $share->name }}</h1>
        <p>{{ $share->message }}</p>
        <p>Why don't you listen to Stalko's new song <a href="#">A Long Wave Goodbye</a>?</p>
    </template>
</body>
This in itself is already very satisfying to me. On page load, Vue’s router kicks in and takes control!
Allowing users to create a message to share with friends
The application needs to collect the following data from the user:
The language of the message that they’re writing
The name of the person this message is for
The actual message.
For aesthetic purposes I decided to split up these actions into three screens. This decision led me to discover a great pattern to keep a growing Javascript app from getting out of control.
The store pattern is explained on this excellent page on Vue’s documentation and recommends to create an object that acts as a single source of truth, and pass that object around to the different modules that you might have, allowing them to interact with it as you see fit. Without this pattern I might have been tempted to use events to communicate between different modules – from experience this can easily become messy and difficult to deal with.
I created my store object to allow me to handle the user’s Share:
I’ve set up a simple Vue component that depends on the store and router objects, and exposes one method: setLocale. The setLocale method sets the locale that it is passed on the store object, and then instructs the app via the router to continue on to the name route.
The template that will be rendered is defined as follows:
<template id="locale">
    <h2>What language will your message be in?</h2>
    <p>
        <button class="btn btn-primary" v-on:click="setLocale('en')">English</button>
        <button class="btn btn-primary" v-on:click="setLocale('mt')">Maltese</button>
    </p>
</template>
Fast Forwarding
I’d like to cover interacting with the server before wrapping up, so I’ll skip setting up the name and message screens and jump straight to submitting the Share in the review screen.
Once ready, the preview is created via the fetchPreview method. I’ve utilized the $http object made available to me by including the Vue Resource plugin.
The review template interacts with the component with a couple of simple bindings:
<template id="review">
    <h2>How does it look?</h2>
    <p>@{{{ preview }}}<p>
    <button class="btn btn-primary" v-on:click="submit()">Great - give me my link!</button>
    <button class="btn btn-primary" v-link="{path: '/locale'}">Start Over</button>
</template>
Wrapping Up
I skimmed over some of the work done setting up this mini website, but I hope that it conveys the thought process behind a test driven application.
Vue and Laravel make for a beautiful combination for web development, this was a fun project.
If you’re not backing up your websites in production, you should be. Be prudent with your backups so that when data loss happens, you can recover quickly and easily.
All projects that I work on are version controlled, meaning that the project files are automatically backed up to a remote repository. Though the solutions I go through include file backups, I’m going to focus on database backups.
Two ways to perform a backup
The backup systems that I’ve experimented with can be divided into two types.
The application handles backing itself up through the code, or
A dedicated external service handles the backup.
Self Handling Backups
I use Spatie’s Laravel Backup package to take care of my self handling backups. It’s easy to set up and allows you to save your database (and file) backups offsite to any of the file systems that you have configured in Laravel 5. Additional features are promised in the next major release which should happen sometime in March.
An alternative package that I haven’t tried myself, but seems to be popular on GitHub is the framework agnostic Backup Manager. It comes with a Laravel Driver that makes it trivial to set up and get your backups going in minutes.
External Backup Service
An external service makes backing up multitudes of websites easier, and gives you a single dashboard to handle all your backups. I’ve recently tried out two similar ones: Ottomatik and BitCan.
Ottomatik
Ottomatik is a service targeted specifically to Laravel apps. It requires you to install a small application on your server before you can start configuring your backups. Once you get that out of the way it offers you a fluent interface to configure and schedule your backups, and optionally store them on your own S3 account.
It’s easy to set up, and at a glance you can see the status of your backups. Having your backups stored on your own S3 account means you can set it and forget it, and happily access your backups directly through S3.
The only downside that I can see to this service is that many of the more useful features are only available when on the higher priced plans, and if you have many websites to backup, you could be quickly forced into paying more.
BitCan
BitCan allows you to configure servers either by installing an application (similar to Ottomatik’s) or by installing their public SSH key. I went for the public key approach as it allows me to easily remove it from my server in the future should I ever wish to.
BitCan’s interface isn’t as intuitive and responsive as I would have liked, but I was able to easily and quickly configure and schedule a number of backups. All backups get saved to their hosted system.
Happily, BitCan’s pricing structure is based on storage, not number of backups, so depending on your use case can turn out to be a very cost effective solution.
Which should I choose?
If you need to backup just a few websites and have an S3 account, I recommend the free self handling method. Laravel Backup and Backup Manager will both do the job for you here.
If you have many websites that you’ve got to backup and the ability to handle them all from one place is a deciding factor, then an external backup service is more suited to your needs.
Of the two services that I tried, BitCan was a more cost effective solution, even though Ottomatik’s ability to upload to your own S3 account would have been a nice feature to have!